
When I arrived a the quilt shop this morning, my project was right where I left it...about halfway through this stage of labeling all the pieces of my pattern.

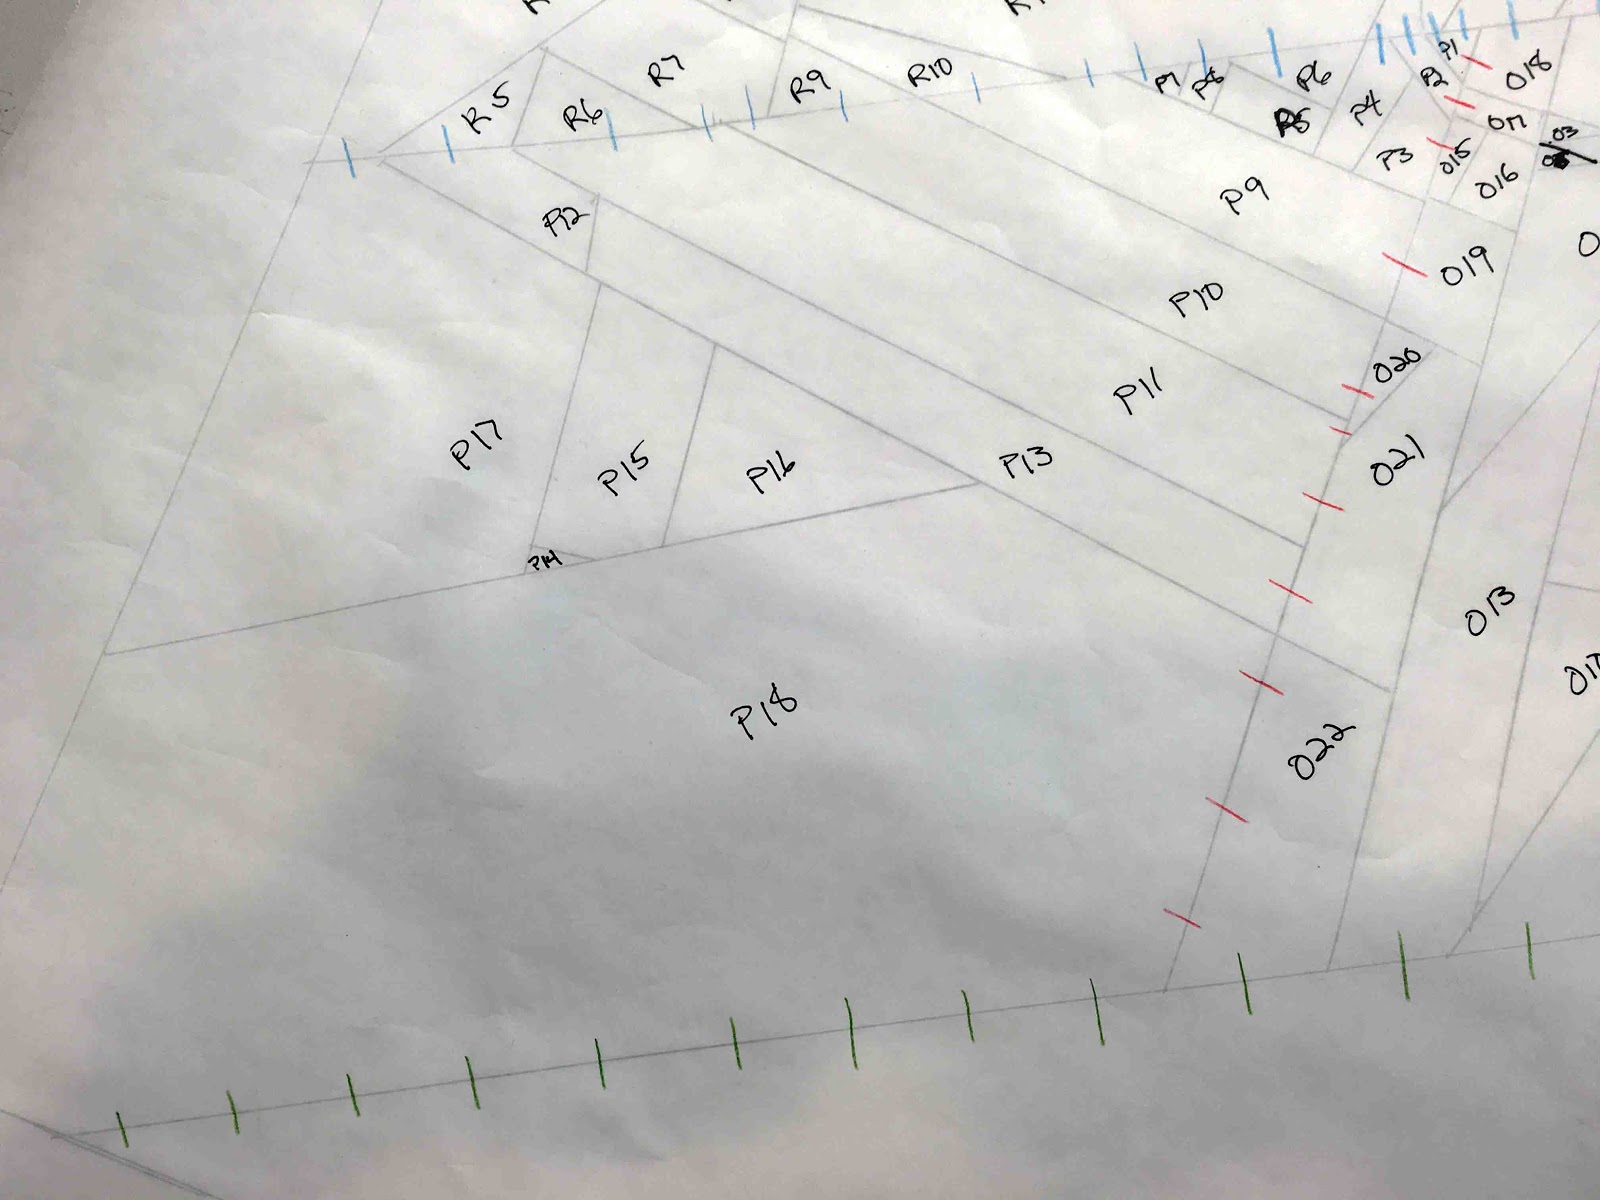
This was the hardest part of the process. We first needed to decide logical sections, which were lettered A, B, C, etc. and then within those sections, we numbered in order of sewing. Here was where we discovered problems in our design, missing lines, lines that were not sewable and made changes where necessary. This was the section I struggled with yesterday, and mainly, I was just too tired to think any more. It's a little like working a jigsaw puzzle and a crossword puzzle at the same time. Also, one has to work out how much detail is necessary. At times, I thought I'd put in too many lines, but when I compared it to the picture again, I realized that it demarcated some detail that was essential.
At some point as I was labeling the chair on the right, it all fell into place, and I wondered why I'd struggled so. I can't even tell you what the point of enlightenment was...it just was. Some things don't need an explanation. Can I get a Hallelujah! When it was all labeled, it look like this:

So at this point, I took my tracing (this was done on vellum) to the FedEx shop (very nice folks, by the way) and asked them to make two regular sized copies of it, and then to blow it up 300%. Mine ended up something like 33 x 42 inches when it was blown up. Then I headed back to the class with my copies. My first job was to color code one of the regular sized copies. There are only four colors in my design: the two chairs, the sand they're sitting in, and some rocks in the background.

Next, we created a freezer paper sheet large enough to cover the entire blow-up. This was accomplished by butting the edges of two sheets together (freezer paper generally comes on a roll 18 inches wide). Then we used cloth tape to first tape them together in just a few places, and then using longer strips of cloth tape to tape the entire seam.

The cloth tape is important because it is transparent when it's taped over the lines and it will stand up to ironing. Paper tape and plastic tape will melt. We're using the same cloth tape you find in the first-aid section of your grocery store or pharmacy.
The next step was to tape our blown-up pattern to a window (a light box would be great, but our patterns were too large) and then tape our freezer paper sheet over the top...shiny side was up here. Then we traced all the lines from the pattern, but not the labels. It's important to use a micro-fine sharpie here. It's the only ink that will (a) write on the freezer paper, and (b) not smear. You might remember that we learned a similar process when I took Lisa Crnich's class last year to make the Four Fabric Forest. (I've linked to it back there so you can read that post if you're interested in this process.)
In this next image, I've drawn in all the lines on the shiny side.

Next, I flipped everything over. The blow-up was flipped over, and the freezer paper was flipped over, and here, I started labeling the pieces. These are freezer paper templates and will all be cut apart eventually. As templates, they need to be mirror images of the original since the freezer paper is ironed to the wrong side of the fabric, as in fusible applique. This is a pain-staking process, but very important for the overall success of the project. Here, I discovered places where I'd misnumbered, or missed lines, and I'll discover more as I move along. In this case, surprisingly, I'd only missed two short lines.

After that, we made tick-marks and these will aid in matching up the template pieces once they've been cut apart. This was done in colored pencil, and the goal was to use a different color on all sides of each piece. We could repeat the colors...just not on the same piece.
When I'd done the whole thing, it looked like this. I'll say here that my classmates were all choosing fabrics while I was doing this and exclaiming things like "Too cool!" and "Awesome!" It was kind of a bummer listening to them, but I'm going to love my design, and so I was just patient with myself, waiting for my turn. By the end of the day, it was worth it.

Next, I took a highlighter and went all around the outside edge (but within the lines) of the pattern. Think of this as the straight size of a jigsaw puzzle piece. You know those pieces are at the edge of the puzzle.

Next, I used the pink highlighter to mark off the largest of the sections...in general the ones where the lines went from edge to edge. Finally, I used orange highlighter to mark off the various lettered sections.

And then I was ready for the fun to begin. We pinned my blown up pattern to a foam design wall, and then I cut my pattern part at the four large sections colored in pink. When those sections were cut, I pinned them over the blown-up pattern.

Ta Da!

In general, if one's design includes an animal, then the fabrics start with the eyes. My two chairs are the main subjects in my design, and so that's where I'll start. These are the fabrics I've chosen for the backs and the seats of the chair. Cool, huh? Suddenly all this pain is starting to fade away...like childbirth once you get a first look at that beautiful newborn babe.

Before I return tomorrow, I'll sew some strips together. I won't try to explain my plan for these, but I'll show you once I have my strips sewn together. And lest you gasp about cutting all those little pieces apart, we start with just one piece at a time. Here is my classmate's pattern of the grandfather and the grandchild that I talked about in yesterday's post. She's added the two heads of hair, and she's getting a start on the shirt.

The fabrics aren't necessarily cut right away, but in this way, they can be auditioned before any sewing is done. Mine will be done a little differently, but again, I'll say more about that once I've sewn my strips together.
In closing, here are a couple more of Ann's quilts brought in today. This is another good example of the "gesture" she mentioned yesterday. Notice how the fabrics all lead the eye to the focal point of the duck.

Also, this zebra, which is available as a pattern. Notice that only one of the zebra fabrics is an actual zebra print. The rest are all stripes of various kinds. The fun fabrics are what I really love about this technique.

Okay, so Mike is on his way up for our First Day of the Last Year of his career celebration. I'm going to rest up a little before he gets here. These long days make my neck and my brain tired.
18 comments:
I'm glad it was a better day! Those projects are amazing. I look forward to seeing more of the works in progress.
I think I would be crying in this class, lol. I am horrible at following directions and that looks like a lot of pieces but a fun class to learn. Can't wait to see what your piece looks like with the fabrics.
Debbie
YAY! So glad it is all working out for you.(I really had no doubts) what a fascinating project. I really admire those artists who can do this.
Hallelujah! Well, you asked for one....but wow! I would have a mental breakdown if I was confronted with that puzzle...and I love puzzles. I can't wait to see your progress...It is going to be amazing.
I'll sing a Hallelujah, too! Glad it went better today, seems a stressful class. Something with too much thought and planning all day long would wreak me - need a change every now and then.
It's a lot of prep for your project, but it's going to be worth it. I love the fabrics you've picked for the chairs.
I am so glad you decided to do the chairs. I have done 2 workshops with Ann. Love her work & her. One of the workshops I did was in Portland, the same event that you did a workshop for doing the "cat portraits". I knew that if you could do them (& you do them fabulously) you'd be a winner in Ann's workshop. You go girl !!!!
I am amazed and impressed with all your work. I don't know if I would have the patience to go through all that. Glad you are having a better day. It will be so gorgeous. Appreciate seeing the other quilts too.
Yes, you get a Hallelujah! I'm so glad it clicked and you're feeling better. I'm still lost and feel like I would have thrown it all in the air and left by now. You're fabrics look great, nice, bright and perfect. You Go Girl!
Oh my goodness what a hard project! My brain hurts from watching you figure all this out! Just amazing!
That is going to look amazing. I have been fascinated with the process, but like the others, my brain would be on overload too.
Adding my Hallelujah to the chorus. I'm looking forward to seeing your completed project.
I am totally exhausted reading this post!!!!!!!!!!!And, since I'm behind on your "life", I'll have to do some major back-tracking to make sense of all this!!!! ( paper piecing is NOT my thing!!!!!) LOL!
Love, love, LOVE how this is coming together. These nit noisy pieces and processes are very taxing but the results are going to be great! What a smart way to control all the sections with pencil marks then hi-lighters. I've used the colored pencil method but never considered the highlighter to differentiate larger blocks and edges. Capital idea! Can't wait for your next post.
I just now read the previous post and I must say that I greatly admire your perseverance! I'm not so sure that I could have collected my senses enough to return to the process. I always lag behind in classes anyway, no matter if it is fairly straight forward. I look forward to seeing how this turns out.
I don't take quilting classes very often anymore but I think I'd really enjoy this one! Your quilt is going to look great.
I'm sitting here reading your post and I look like a deer in headlights. You surely have way more patience than I do. All of those line, numbers, tick marks, etc. WOW. I have no doubt that your project will be awesome when finished. Enjoy your celebration with Mike.
I'm with Janarama, I'm also over awed by the detail and complexity. I'm amazed how much you've done and look forward to the project coming together. Am loving the gesture of the 2 chairs together to represent such a happy anniversary.
Post a Comment