
The day started out pretty well. Actually, there was a little bump in the proverbial road when Mike told me he needed to go to the dentist (lately, his home away from home) and asked if he could drive my car. His has our camper loaded on his truck, which means (a) that he can't drive it into the underground parking garage at the dentist's office, and (b) I can't drive his truck because I'm not checked out on the camper yet...nor do I ever want to be for the rest of my natural life. (Think of "life" as the operative word in that sentence.)
So upon hearing his request I exclaimed, "Oh No! That means I can't go to Zumba Gold today! Despite my assurances to my friends in Blogville that I wouldn't make any excuses, I won't be able to go to Zumba Gold!!!!" And then, I cried my eyes out as you might imagine. All I could do is sew at that point. And bake bread. Because with all that disappointment and lack of exercise, baked goods were completely in order. I know you understand what I'm talking about. (Did you see how I made that avoidance of exercise Mike's fault? I wasn't born yesterday, you know.)
Okay, so Mike left, taking my only mode of transportation, and I was left to moan in sorrow. First, I got my bread mixed up and rising, and then I headed into the sewing room. Things started out great. I was able to finish up the two blocks I needed for the Rainbow Scrap Challenge. Recall that I'm making the Dream Machines quilt by Barbara Weiland Talbert. If you like this, you can find a link to the free pattern right here.

I was behind by two months, and so yesterday, I made March's teal block...the colors didn't reproduce well in this image, but I think I'm good with my "teal". (As an aside, I really hate it when the chosen color is "teal". I can never decide what color that is. Is it blue? Is it green? Is it aquamarine?)

And also February's block, which was pink.

Recall that these will eventually be embellished with buttons, but I won't do that until the whole thing is finished. I took this picture of January's blue block to show you.

I have some colorful wooden buttons on order for this purpose, but they haven't arrived yet. Also, I'm planning to stitch in a needle on the sewing machine using metallic thread at some point...probably when I do the quilting.
Since I'm making 12 blocks rather than the 16 in the original pattern, I'm calling the first row complete!

Saturday, I'll link up to:
.jpg)
So far, so good. Nothing scary yet, but things started getting dicey here. Like the swimmer going into the water in "Jaws", everything seemed fine. It was even fun! Little did I know there was a shark about to bite off my lower torso. But don't let that bother you. I'll tell you when to cue the scary music.
This is my project for the Let's Book It Challenge.

I'm doing a project from this book:
And this is a completely new technique to me, and so I actually read the instructions! I know! It's surprising then that things worked out so badly. But, I'm getting ahead of myself again. Is the suspense killing you? No reading the ending. You must proceed step by step. (Slowly I turn, step by step, inch by inch...please tell me you're old enough to remember the Three Stooges.)
I took lots of pictures because I wanted to be able to tell you about how this presumably successful project all came together. Little did I know, but I'll launch into it anyway, giving you my thought process as I go. You might want to fasten your seat belt and strap on your helmet...just sayin'.
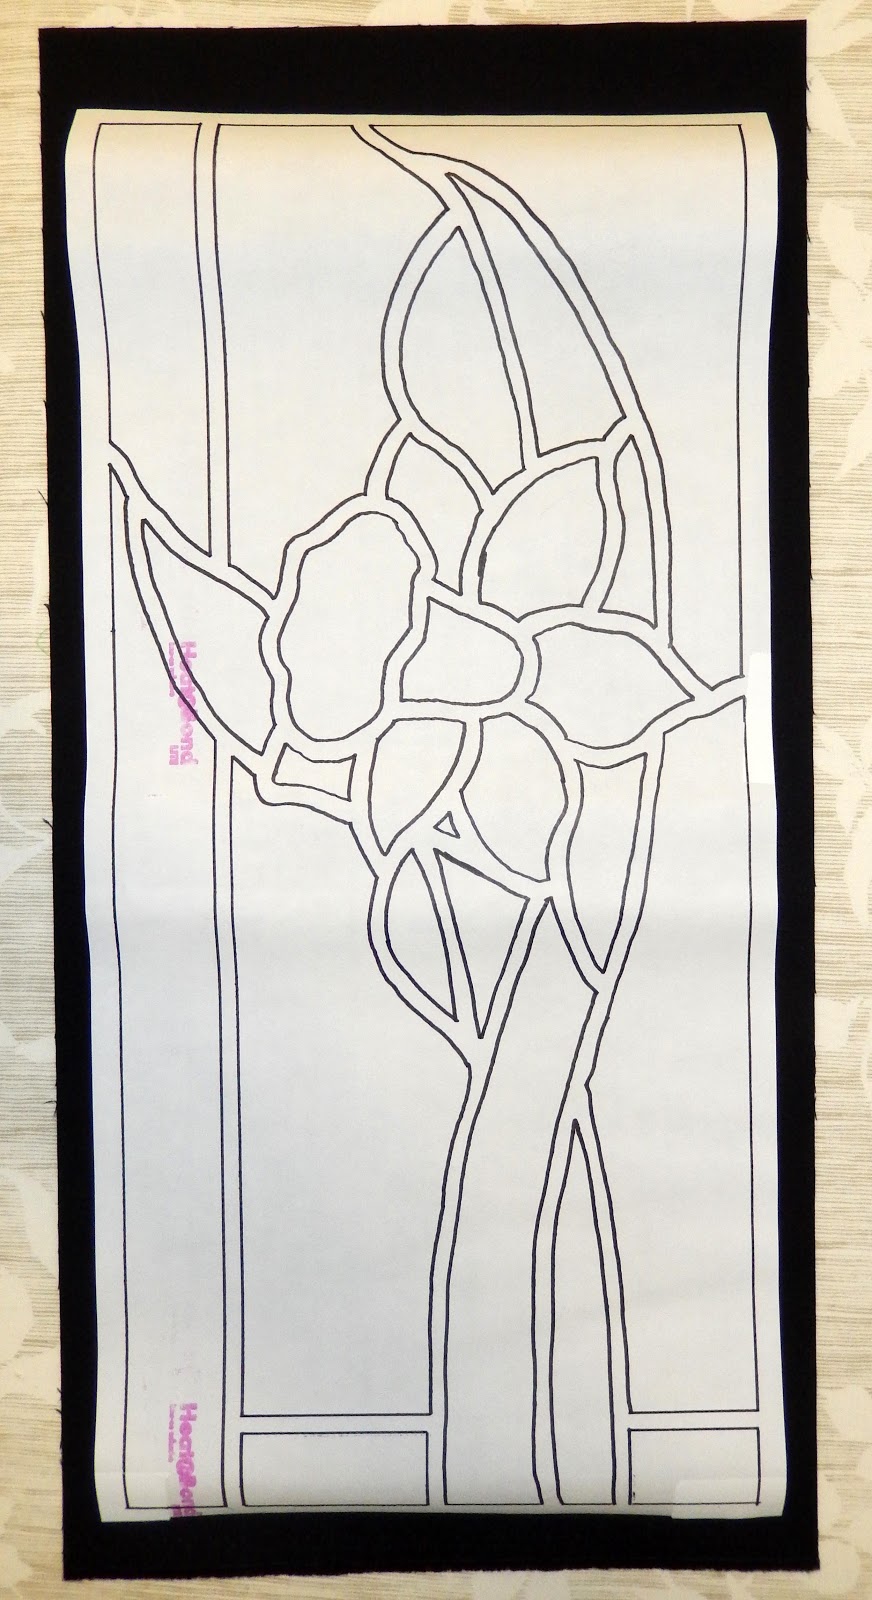
The pattern was on three pages, and while the authors wanted me to trace a pattern onto tracing paper, I simply copied it and taped it together. (Incidentally, they warned me that copying it on my printer could result in distortion, but I forged ahead. This has nothing to do with the shark.) I started by taping the three sheets together, and I ended up with this:

My next step was going to be to trace the "leading" part of the design onto fusible web. Here, I used this very useful product, Post-It tape, which is essentially paper tape. I like it for a lot of things, and I often use it to repair my pattern when I make a mistake with paper piecing. You can stick your pattern back together and even sew through the tape. Like a post-it note, you can reposition it without tearing your paper too. The only place I've found this product is at Staples office supply stores.

I used it to tape the fusible web to the pattern so that the fusible web wouldn't shift, and I could remove it without tearing the pattern. Then, I set it over my light box and went to work tracing.

When I was finished, I had something that looked like this. There was no need to label the pieces at this point because I was really only interested in the black lines--the "leading" of the stained glass.

Then I removed the tracing from the pattern so that I ended up with this:

And here, I'll say that you should not tape your fusible over the areas where you are going to be tracing because when you remove the tape, part of your tracing will go with it. This was only the first of many mistakes I was about to make. Still, I was blissfully ignorant, and so I was able to make adjustments, confident that things were going, um, swimmingly. In other words, the shark hadn't arrived yet.
Next, I was instructed to trim my fusible to 3/8 inch from the edges of the design. Okey-Dokey.

Now, all kidding aside, I feel I must take issue with the next bit of instruction I read. To-wit:

With all due respect to the authors, if you do this, your fusible may lose its ability to stick fabrics together. In my experience with applique, starch somehow interferes with the fusing and your pieces will not stick satisfactorily. I use Heat 'n Bond Lite. It's the only produce I've ever used because it works, and I've never felt a need to try anything different. (If it ain't broke, don't fix it.) I can only attest to how Heat 'n Bond works, and possibly there is another product for applique that will work with starch, but that hasn't been my experience. So, I skipped this step, and that has absolutely nothing to do with the problems I experienced down the road apiece.
Okay, moving on...Next I fused my tracing to the black "leading' fabric. If you're a person who dislikes waste, then you probably won't like this technique because all the pieces of the design will be fused and cut out, and you're only going to be left with those quarter-inch leading lines. The rest will be discarded. I'm planning to save mine for a little while...maybe I'll use it for something...but at this point, I can't imagine what that might be.
Once I had that fused down, I started cutting. I started out with my craft scissors.

Initially, I thought I might use the craft scissors for all of the cutting, but I quickly changed my mind. Do your craft scissors hurt your fingers? Man, mine sure do. In the end, I was using four different cutting tools. My smallest rotary cutter worked well for long gentle curves.

For long, curvy curves, I used my regular sewing shears. For straight lines, I used my ruler and my regular rotary cutter...in all, four different tools.
Here's where you should cue the scary shark music. I was still blissfully unaware when I took this next picture, but this should have been my first clue that I was flying off in the wrong direction. I took this picture to warn you to be careful with your cutting blades because I was ending up with a spaghetti monster.

When I had it all cut out, I ended up with this:

Cool, huh? Only one problem: I was supposed to have left the black border surrounding the whole design. That would have made the design a lot less flimsy and easier to work with. Still, I hadn't seen the shark yet, even thought the music was playing. I was still having fun! I just figured I'd sew a border around the whole thing when it was finished. No problem!
(Music gets louder and more urgent now.)
So then, I moved onto the next part, which was to make freezer paper templates of the "stained glass" pieces. And here, this technique is kind of cool because any pieces of the same color that are adjacent to one another can be cut as one large piece. The authors suggested tracing the templates using the inner lines of the design and then cutting them with a 1/4-inch border around. I just traced them with some extra around the edges, and I roughly drew in the parts of the design to assist in placement, even though I was going to cut it as one large piece. (I'm hoping this will all make sense in a minute.) I started with the daffodil:

And I'll say right here that I have never tried making templates with freezer paper before, and I was surprised at how well it works. Even though I've read the instructions for doing this many times, I never really believed that the freezer paper would stick when it was ironed.

But it did! It worked great! Simply amazing! And when all was said, done, and cut out, this is what I had.

And I proceeded with the rest of the pieces, and then is when the trouble started. I found it extremely difficult to get the placement right. And I grew increasingly frustrated, although I was trying to be patient with the fabric and with myself. I'll say right here that I read the instructions before I started, but I think I had a preconceived idea about how this was going to work and I read what I thought I was going to read. After the disaster had completely played itself out, I went back and re-read them and then the light bulb came on.
Anyway...continuing on with being eaten...avert your eyes if you must because things are about to get bloody.
When you look at this image below, it doesn't look too bad. There are a few sections off, and I was using my tweezers trying to get everything just so. But first, I started wondering how such a tiny bit of fusing was going to catch all of the pieces underneath. And every time I thought I had it all set, something would happen to mess it up. Once, I caught my sleeve and brushed it across the whole design just when I had it perfect. Drat. Then, I caught the tweezers on the "leading" and moved it. Then, I realized that there were going to be places where the fusing was showing through to my ironing board cover below, and if I fused it, I was going to fuse it to the ironing board cover. So then, I tried carefully sliding my pressing sheet under the whole thing without moving it. Hahahahahahahahahahahahaha.

Finally, I had it just right (I thought), and I started fusing it down. When I was finished, I was dismayed that, in fact, some of the pieces were not fused down.

And there were gaps and overlaps.

I thought I might be able to make repairs with a Sharpie, but that really was not satisfactory.

It was the sort of thing that might not have been obvious to the casual observer, but I knew that it would be the only thing I would see every time I looked at it.
As for the pieces that weren't fused, I tried cutting a piece of muslin and using 606 spray to fuse the whole thing to a sheet of muslin. That still didn't solve all the problems with the piece. Here's where I stopped for the day with the design looking like this:

I can hear you now being all nice and saying, "It doesn't look so bad." Maybe not, but I know I'll never be happy with it like that.
So at that point, I went back and re-read the instructions and found solutions to each and every problem I have encountered thus far. Even though I was reading it for the second (or even may be the third) time, I was reading it with fresh eyes. I like the looks of this enough that I'm going to give it a second try today. And if you never hear from me ever again after today, you'll know it's because I slit my own throat with my rotary cutter in frustration. Still, I'm not ready to give up. There are some really great projects in the book, and I'd like to make it work if I can.
When all was said and done, my sewing room was completely trashed:

Yes, things get messy when sharks are involved.
[Edited to say that if you want to see the exciting conclusion to the Disastrous Daffodil Debacle, click right here. Spoiler alert: It's good news!]
But the day wasn't a total loss, because I did get those Rainbow blocks done. And while I was swearing at struggling with this project, I was also baking some Carrot Raisin Bread.
I found this recipe in "The Baking Sheet", a publication of King Arthur flour. The note on the page with the recipe notes that this recipe was shared by one of their readers from a book in her collection called the Custer County Cook Book, that was complied by the Home Demonstration Club of Broken Bow, Nebraska in 1961. I have an idea that is something like the cookbooks quilting guilds and church ladies put together. Anyway...all of that to say that this turned out great. It contains only one tablespoon of sugar and one tablespoon of butter. The only other fat comes from one egg. Otherwise, it's just packed with healthy goodness. We each had a slice for breakfast this morning, toasted with butter, and it was really nice. Most of the sweetness comes from the carrots and the raisins. I used golden raisins. As I've said before, I don't like those brown rabbit oofie looking things in my baked goods.

Here's how it looks when you cut into it. Be sure and note the absence of rabbit oofies:

And here's my adapted recipe:
Carrot Raisin Bread
adapted from the Custer County Cook Book,
compiled by The Home Demonstration club of Broken Bow, Nebraska, 1961
1/2 Cup Milk (4 Oz.)
1 Tablespoon Sugar
1 1/2 Teaspoons Salt
1 Tablespoon Soft Butter
1 Large Egg
1/4 Cup Lukewarm Water (2 Oz.)
2 Teaspoons Active Dry or Instant Yeast
3 - 3 1/4 Cups (12 3/4 to 13 Oz.) Unbleached All-purpose Flour
1 1/2 Cups Grated Raw Carrots (5 1/4 Oz.)
3/4 Cup Golden Raisins (4 Oz.)
1/2 Teaspoon Cinnamon
1/4 Teaspoon Allspice
1/8 Teaspoon Cloves
Combine the milk, sugar, salt and butter, in the bowl of your mixer or the pan of your bread machine set on the dough cycle. Add the egg, water, and yeast. Add 2 cups of the flour and mix to combine. Add the carrots, raisins, and spices, and stir. Add the remaining flour, a quarter cup at a time, until a soft dough forms. Knead the dough on a floured work surface for 8-10 minutes, or let the machine finish its cycle. Place in a greased bowl, cover and let rise until doubled in bulk (about 1 1/2 hours). Using floured hands (the dough is sticky), punch down the dough and let rise for another 30 minutes. After the second rise, shape into a loaf and place in a greased 8 1/2" x 4 1/2" bread pan. Cover and let rise until the dough domes an inch above the rim of the pan. Bake in a preheated 350°F. oven for 45 minutes. Tent the bread with foil after 30 minutes to prevent overbrowning. Remove from the oven, tilt out of the pan, and cool completely on a rack before slicing.
So today I'm going to give the daffodil project one more shot. I suspect that will take a good portion of the day, but I have a few housekeeping chores to do as well. If there's time time left in the day, I might get to work on some of the other items on my March to-do list, which mainly consists of making blocks. I'm still hoping to get to work quilting the Shine On wall hanging, but that may have to wait until next month.
And as long as we're talking about the end of the month, I should remind you that the March NewFO Challenge and Linky party goes live on the blog on Monday. Are you ready?

22 comments:
I live just 50 miles from Broken Bow!! Wish I had that cookbook!
I know you don't like your stained glass wall hanging but I think it looks amazing. Practice makes perfect. I still have my first quilt with all it's mistakes and I love it more now even though at first I hated it and gave up quilting for 8 years because of the frustration of it.
I haven't laughed so hard in a long time, of course while making the scary Jaws music DA-Dum DA-DUM...LOL! It is pretty even with the mistakes, but like you I too would remake. Good luck!
Oh do I sympathize with your dilemma! I laughed and then I stopped - this is eerily familiar! I almost started crying. And your sewing room, OH MY GOSH. Been there many times! I just would never have admitted it, let alone post it. You are my hero!
You have just convinced me to never give this technique a try. LOL. :-)
The bread looks delish!
Oh Barbara, I didn't mean you were my hero for a failure! I meant you were my hero for being willing to share your mistake! LOL I, however, have shoved my mistakes under my work table and ignore them. Every now and then my grandchildren say, "Grandma, what are these?" and I sheepishly say, "Unfinished Projects."
I love rabbit oofies in my baking. Where's you sense of "nature? Good luck with your daffodil. Now that you've got your 'practice' piece done, the second one should be perfect.
And I thought I was the only person that could translate a pattern any way but what it was suppose to be. I'm not feeling so lonely now....giggle. Good luck with your next try.
Mmm your bread looks yummy!!
Can I make a suggestion with your daffodil? Forget cutting the leading, it is too narrow and you will never be happy. Instead cut each colored shape individually rather than joined together, and then fuse them to an uncut piece of black so the leading shows through rather than sits on top. It will give it a different look to the original, but it might be worth it to save your sanity :)
The recipe looks yummy. That is more fussy fusing than I would want to do.
My Guy is intrigued with your carrot bread recipe, so that may make an appearence at our house soon.
Hopefully the second time was the charm. I'm not sure I would have had the stamina to try it a second time!
Bruce keeps giving me looks as I laugh at some of your quips. I hope that your second attempt goes smoothly and turns out well. I use that quote from the stooges from time to time! Shame on Mike for putting his dental health ahead of your Zumba! Lol I don't think that I've ever had golden raisins. I was cracking up over the "rabbit oofies".
The bread looks yummy. Thanks for sharing. I never thought about raisins that way, but your right, they do look weird.
Been there, even the mess looks so familiar, part of me says it's from trying to follow directions, but I think it's just a new concept that you need to wrap your head around.
LOVE your story! I use pre-fused black bias that can be bought on a spool and just fuse around the background pieces as I go. Don't have to prepare it or anything. Just iron it down! Thanks for sharing! Made my day! XO
No mistake is wasted if it can turn into a good story. And there is nothing like having tried for making one see what the directions really say! (I did have the advantage of having read the success first.) That book will lead to some great projects.
What a day! I hope Mike's done with the dentist for a while now. I know what you mean about not wanting to be checked out on the camper - when I was a "tire buster" at Sears (worked in the auto center changing tires, shocks, doing oil changes, etc.) I always said I didn't know how to do split rims (a sort of commercial tire rim that is in 2 pieces), even though I did. Let the testosterone boys play with those dangerous toys! But I'll bet Zumba Gold had been looking forward to you.
I say Teal = Blue/Green.
When reading the beginning of the last part "Little did I know there was a shark about to bite off my lower torso.", I read it as a SNARK! LOL
I wonder if you could spray the RIGHT side of the fabric w/starch - if that would be a problem for the fusible? Sorry that had to be such a painful learning episode! I agree though, that you would have always seen those nasty bits if you went on with this first try. I might have melted the paint off the walls if that had been me!
I Would not have been happy either. I understand starting over!
What a good story. Thanks for sharing. The final product was worth the frustration. :)
Barbara, with everything going on with this piece I am sure you got as much exercise as if you had gone to your Zumba class. I love your Rainbow sewing machines and thank you for the link. The stained glass piece is beautiful, I think I would have just cut a black background and placed my applique pieces on top.
I'm going to enjoy watching your rainbow machines come together this year.
No way am I ever going to try that flower block.
Oh Barb, thanks for rejuvinating htis post under Tuesday ARchives this week. A good read and a yummo recipe!
Post a Comment