
Today I'm trying to restore myself to my comfortable routine, and that includes my morning embroidery. The last time I embroidered, I finished up the fourth of the wonky houses. Now, I'm left embroidery projectless which is something of a travesty in my world. Today I set about to make up a new embroidery motif to work on.
By all rights (those would be the rights of quilts to be worked on regularly), I should be working on the Gardener's Journal quilt.

I'm kind of excited to try the new product I've recently learned about by Sulky, called Sticky Fabri-Solvy.

Since I've already done several of the Gardener's Journal quilt blocks in the old-fashioned, low-tech way, I was kind of afraid to switch horses in the middle of the stream. It seemed to me that the blocks might end up looking slightly different, and I didn't want to risk it.
Enter: A New Project!

Pause here for a moment to be in awe of how good I am at rationalizing starting something new. Too bad it isn't an Olympic event because I'm sure I would win the gold. And on that note, do you think it would be a summer or winter sport? Would it be judged like ice skating and gymnastics? Or would it be a timed event? Do you think I'm onto something here? (Note to self: write an email to the IOC suggesting this new event.)
But I digress.
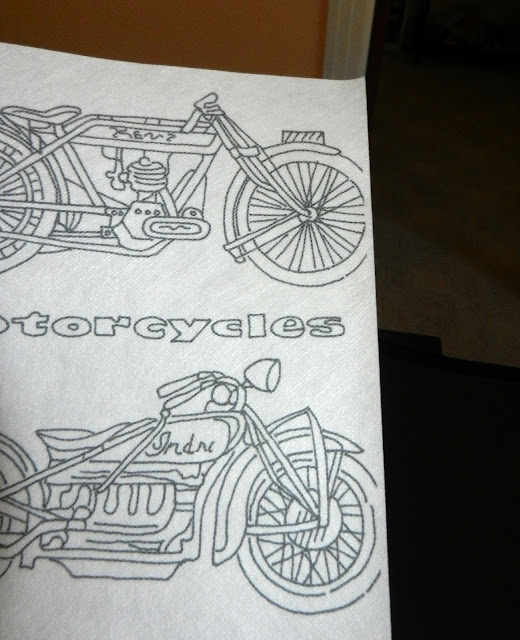
So, you know I've been dying to start the Vintage Tin project. This is a quilt I'm making for my son Erik who works in the auto industry. It has ten embroidered sections. The four in the center are quite large, while the six on the right and left side are smaller. I decided for this first try to work with one of the smaller sections so that it would fit all on one sheet.


Enter: A New Project!

Pause here for a moment to be in awe of how good I am at rationalizing starting something new. Too bad it isn't an Olympic event because I'm sure I would win the gold. And on that note, do you think it would be a summer or winter sport? Would it be judged like ice skating and gymnastics? Or would it be a timed event? Do you think I'm onto something here? (Note to self: write an email to the IOC suggesting this new event.)
But I digress.
So, you know I've been dying to start the Vintage Tin project. This is a quilt I'm making for my son Erik who works in the auto industry. It has ten embroidered sections. The four in the center are quite large, while the six on the right and left side are smaller. I decided for this first try to work with one of the smaller sections so that it would fit all on one sheet.

These are some of the fabrics I'm using in this quilt.

Lately I've been kind of careless about washing my fabrics before I start a new quilt, and I know I'm going to regret it one of these days. In an effort to mend my ways (and because I'm putting black against cream in this quilt), I spent yesterday afternoon washing all of these fabrics as well as the fabrics for a table runner I want to start. If you don't know this trick, I'll share it with you. To help with the fraying that invariably occurs when you wash fabrics, pink the cut edges before washing. You can use your pinking shears, or you can put a pinking blade in your rotary cutter, which is the way I like to do it.

It won't completely prevent the fraying, but it does reduce it approximately 80-90%. Way worth it, in my book.
So, I started this morning doing a lot of ironing.

Once that was done, I got going making up the motorcycles section of the quilt. The smaller sections are cut to 15 x 15 inches and then trimmed to 9 1/2 x 9 1/2 inches once the stitching is finished. I'm using this same white dots on cream background for all of the embroidered sections.

I always back my embroidery pieces with muslin or stabilizer of some kind. It keeps dark embroidery floss from showing through on light fabrics. And I'll just say right here and now that I am an unapologetic lazy embroidery person. I have no qualms about traveling from one section of the design to another without cutting my floss and starting fresh. Can you tell?

No, I didn't think so. If I were working on something where the back was going to show--like a tee towel, for instance--I might worry more about it. For a quilt, I suspend worry and just do it the lazy way. On the other hand, do you note the running stitch on the wallpaper in the piece above? That would show through if I didn't back the piece in some way, and so I do.
In this case, the Sticky Fabri-Solvy is already a stabilizer, and so it seemed wrong somehow to put a second stabilizer on the back. I decided to use muslin for this quilt, and I cut a piece the exact same size as the quilt fabric.

I use 505 spray to stick it to the back of the quilt fabric so that it doesn't shift while I'm stitching. I happen to think 505 is a great product, and I use it for soooooooo many things.

I just take it outside and lightly spray one side of the muslin, and then lay it sticky side up. Then I smooth the quilt fabric over the top of it.

With that part done, I was ready to move onto the Sticky Fabri-Solvy part of this adventure.

But first, I searched YouTube for a tutorial, and found this great one from Wendi Gratz at Shiny Happy World.
So, okay, I'm game now. The sheets come in 8 1/2 x 11 size so they fit into the paper tray of your ink jet printer. (You must have an ink jet printer. If you don't, you can probably take them to your local library and print them there.) One side of the sheet is shiny.

The other side is a waffle texture (not a Belgian waffle, mind you), and that is the side where the printing will go.

I laid it over the original design to make sure it would fit on one sheet.

What do you think, Smitty? Will it work?

My expert consultant thought this was a good fit. He took his per diem in catnip.

You'll need to know the correct way to load the sheets into your printer. Mine is one of those magic ones that flips the paper over as it prints. Stabilizer side down was the way for me.

Then I just copied as usual and voila! Embroidery design transferred with nary a hiccup or complaint from my printer (which tends to be on the sensitive side. We always stroke it and speak kindly to it--offer it a sandwich--before doing something like this).

If I had moved the original just a little to one direction, it would have fit easily on one sheet, but it cut off just a tad on the right hand side.

No problem. I decided to deal with that in a second, but first, I stuck it to my quilt fabric. The shiny side peels off just like fusing medium,

and then you're left with just the stabilizer to stick to the right side of your quilting fabric.

It was easy to smooth down, and from what I understand, it can be peeled back up and repositioned if necessary. I didn't need to do that, but I'm taking Wendi's word for it.

Then, to fix that little part that got cut off, I just laid it on my light box and lined up the original underneath.

Then I used my Pigma Micron marker to fill in the rest of the wheels. (Pigma Micron markers are my usual way to trace embroidery motifs onto quilt fabric. I'm happy to only be using them for about ten seconds to transfer this rather detailed design.)

There we go. All better.

The entire quilt is stitched in one color. I'm using DMC 844.

I just hoop as usual, and now I'm ready to go.

Hopefully, this will all go smoothly, but I'll have to get back to you about how it works once I'm finished stitching it. Then I'll be dunking it in water to dissolve the stabilizer from the top. Keeping my fingers crossed that it all goes smoothly. Where this tutorial is concerned, I'll have to meet you on the other side. Edited to say that you can see the exciting conclusion of the Sticky Fabri-Solvy Solution right here.
Updated to say that I'll be linking this post to:
Also, I need to get caught up with a couple of challenges I'm following along with this year.
First, the Rainbow Scrap Challenge color for July is "teal". I'm a little hazy on exactly what color "teal" is. Is it blue? Is it green? Is it aquamarine? (Perfectly poetic.) I'm going with these colors for my teal ladies, but I don't know when I'll start on the block.

Also, it's time for the mid-month check-in for:
I'm quilting and binding the Hello Sun quilt this month, and I haven't progressed very far. I do have the fabric for the back now, and yesterday, I measured it for cutting and sewing. I have three yards that need to be cut in half and sewn together. This is where it stands as I write this.

Today, I need to see my dermatologist for my regular check up. Hopefully, he won't find anything new, but he seems to find something more often than not. Keeping my fingers crossed in that regard. When I'm done with him, I'll be making a quick stop at the grocery store and then heading home. Hopefully, I'll get this back made today, and then I'll be ready to set up the machine for free motion quilting. I have some great ideas for this quilt, and so I'm kind of excited to get started.
How's your Monday going so far?
25 comments:
Wonderful information and look forward to your analysis of this product. You have a lot of stitching to do.
I will be interested to see how the stitching looks when it dissolves and how well it dissolves, thanks for the tutorial of products we can try. I used some dissolvable without the stick and it moved as I sewed, so it wasn't very nice stitching.
Debbie
My experience with this was that you have to keep a tight tension on the stitches as you go otherwise you find yourself with loose stitching once you dissolve the stabilizer...hope you have better success...
Just started "Vintage Tin" last week. I also picked the motorcycle block to start with, thinking it would be one of the easiest & quickest. Those spokes are taking forever :) Did my transfer the old fashion way, but used a Pilot FriXion pen. Your way was a whole lot faster, thanks for sharing. Have a great day!
Did I understand correctly - you are NOT using a muslin backing? If not, once the solvy is dissolved your traveling stitches will show and I know you don't want that to happen. Maybe I misunderstood.
Good explanation of the transfer process. I'm still working away on mine so no end product yet.
Well that seems much easier and quicker than traditional transfer methods. I will be trying mine out soon. Love the fabric for the back of the Hello sun quilt.
Thank you so much for this post. The most recent stitchery I did (which was secret stitching so not revealed yet) mentioned this technique but I had not heard of this solvy stuff so went with my trusty method of pigma pen and lightbox. I will definitely go out and source the product to use from now on.
Cath @ Bits 'n Bobs
This looks like a wonderful product. I can't wait to see how you like it when it's all said and done. Love the bikes as well.
I have a question about using muslin as your backing for stitching. You spray with 505 and attach your muslin to the fabric you're going to do you embroidery on.
After you're done with the embroidery, do you leave the muslin on the whole block? So when you sew the blocks into a quilt top your embroidered blocks have two layers of fabric?
Glad to hear you're getting back into your embroidery groove. It will be interesting to hear how the sticky solvi works.
I've actually finished 2 projects today!! Both for my sister's b'day (which was last month - oops!), a pillow cover that was part paper pieced (second try, first one was done in by an icky iron) and a dish drainer that is an old dish towel on one side & partially free-pieced on the other. I'll be off to the post office tomorrow to send them on their way to their new home. AND they were all made with stash stuff!
Very interesting, I don't do embroidery but could you use that stuff to do free motion quilting designs?
Thanks you for this tutorial and happy stitiching,your new project is just gorgeous!!
Great post on the 15th. I always enjoy your writing.
Here is a tip that you might not know about regarding your pinking blade - you can sharpen it yourself and you will give it a little more life. Take some tin foil, about 3" or so. Fold, fold, fold into sort of a square. Run your blade back and forth over the foil until you get tiny shreds. You will be surprised at how it actually sharpens. The pinking blades aren't as cheap as the other ones, so its good to to. I do this with all my blades, then put them in a "used" blade container and then use them at Christmas in an extra rotary cutter while wrapping gifts. It's so easy.
Will have to try that Sticky Fabric-Solvy. Would be so much easier than tracing. I am still slowly working on my flower basket squares. I will probably be collecting Social Security (if it is still around) when I finish!
I was surprised to see that you use muslin for the back of your embroidery. When I started the embroidery for this quilt that I keep talking about, the gal at the quilt shop told me to back it with a thin poly batting. Now that I am on block 8 I will have to keep going, but I am sort of anxious to try using musin or a cotton.
I too, have those little clear bowls like you put the catnip in. Got them at Dollar Tree. They work well for my foster kittens - still have to watch them eat, the big cats love Royal Canin Babycat food. I equate it to a big DQ treat!
Have a good day! And thanks!
Meg
Good tutorial on the Solvy and glad to see that you have the same printer that I have and it worked. I'm going to look for the Solvy the next time I'm out and about. Hot and humid here so trying to get some free-motion done. Might fish and/or swim today instead.
I'll be waiting to hear how this sticky-solvy stuff works out. Looks like it might be the ticket for transferring that Bonnet Ladies pattern I found earlier this year. Looks like a fun project for Erik.
We use Transfer Eze which is much like Fabri-Solvy but a little more expensive. My daughter, who does most of the embroidery around here, was skeptical at first, but she wouldn't stitch any other way now. She was afraid it would gum up her needle but it doesn't. She stitches through batting which means that her finished pieces look already quilted and she doesn't need to bother with a hoop.
A friend is doing the Vintage Tin pattern and is going to use names of streets and places that mean something to her. You might want to think about adding that touch for your son as well. Makes for a great memory type project. Have fun!
I just discovered a product called transfer-eze which is pretty much the same thing and I love it!! It was so easy to use... well worth the money... hope the skin doctor gives you the all clear this time around!
gosh, that's an awful lot of stitchin' but I'm sure it'll turn out really nice - your work always does!
Thanks for sharing the Solvy process - as I was reading, I was concerned about you using it as a stabilizer to prevent the show-thru ('cuz I know Solvy gets washed away), but then I saw what it was used FOR & I quit worrying on your behalf. Looks like you have it perfectly under control.
We spent today at a cardiologist's office (never been to one of these before) - apparently there was an "abnormality" on a pre-surgical EKG. Turns out, it's just a leaky valve, and torn rotator cuff repair is scheduled for tomorrow. It's hubby's and I've been trying to get him to do this for, oh, I dunno, about 5 years now. Hmm...too bad you can't email me your pattern and fabric - I think I'm gonna have some stitchin' time on my hands, at least for tomorrow. :)
Am waiting for the "rest of the story". Great info and you are sure the busy one!!!!
You are surely very busy. Fabric for the Happy Sun quilt is just perfect...
I really like the embroidery designs you are making for your son. Thanks for the info on the neew product too. I'll have to look for it here.
Such a fun post to read! I love the Solvy sheets too...saves a lot of time in tracing designs that's for sure.
Love the backing for your UFO this month!
I'm curious to see how the Fabri-Solvy works. Have fun with your NewFO.
Thanks again for this information Barbara, I look forward to trying this out!
Post a Comment