
Today, I'm sharing my secrets for fusible applique. Fusible applique is fun and easy to do. When I started quilting in 2008, the first quilt I made was a traditional nine patch and rail, but the first quilt I actually finished was fusible applique. It was this "Girlfriends" quilt for my dear friend, Sue. The pieces are fused to the background and top-stitched using satin stitch.

I purchased the pattern before I ever learned to quilt. I had always wanted to learn, and it was my desire to do this quilt that really sealed the deal. With no idea how to do applique, I was really flying by the seat of my pants! Thanks to the women at a local quilt shop who offered coaching and support, I was able to finish the project. It was only the first of many applique quilts that I would make, and it seems there's always at least one on my list of works in progress.
There are many ways to do applique, and many products available, and so this tutorial shouldn't be seen as the only way to do it. It's the way I do it. Here are some of the quilts I've made using this method.
Butterfly Garden: The butterflies are affixed using fusible applique, and the designs on their wings are machine embroidered using a narrow satin stitch.

A Cat for All Seasons: This was the second applique quilt that I completed.

Checkerboard Flowers: This was a block of the month quilt. The applique pieces are pinked at the edges and then details have been machine embroidered onto them.

There are many ways to top-stitched fused applique pieces. This is only one way to do it. In this case, the edges have been pinked and the machine embroidered details serve as the top-stitching to hold them in place. I've stitched approximately 1/4-inch from the edges with the idea that the edges will "rag" when the quilt is washed for the first time, giving it a three-dimensional appearance.

Home is Where the Heart Is: Another block of the month, these pieces are top-stitched using the more conventional buttonhole stitch (or blanket stitch).

This next image shows the stitching detail for buttonhole stitch. I like the effect of this stitch, and it's the one I use most frequently.

A Kitten's Tale: This quilt combines the look of fusible applique and hand embroidery. The top-stitching for these applique pieces was done using a straight machine stitch very close to the edge. In this way, the stitching tends to disappear.

This next image shows the stitching detail.


There are other ways to do top-stitching as well, and you need only be limited by your imagination. For example, this is a quilt I'm still working on. This is a block from the Hello Sun quilt along project.

In this case, I've used a very short straight stitch and stitched around the edge of the applique three times in order to give it the appearance of a child's drawing. Of course, top-stitching is only the finishing stage of fusible applique. And I imagine you're wanting to see how it's done.
Fusible applique shouldn't be confused with "needleturn applique" which is defined on the Quilt University website as as a method of appliqué where the point of the needle turns under the seam allowance as you hand sew. Fusible applique is applique using fusible interfacing. You can iron the pieces of your appliqué to the surface of your quilt. Different weights are available and affect how stiff the finished product will be.
You'll need a few items to complete a piece using fusible applique. Of course, you'll need fabrics. You'll need something for your background, and you'll need different fabrics for your different applique pieces. And you'll need thread. I'll say more about that later.
Also, you'll need some sort of fusing medium. I like Thermoweb Heat 'n Bond Lite.

It was recommended to me. I tried it and liked it. It's never given me a bit of trouble, and while I've tried other fusibles, this one is my favorite. It is readily available at most fabric stores, and can be purchased in pre-cut rolls or by the yard. I prefer to purchase it by the bolt. I do a lot of applique, and this is the most economical way to purchase it.
Also, a good pair of applique scissors is highly recommended. Applique scissors have a curved or shielded blade so that you can snip without cutting your fabric. My favorites are these Galaxy brand scissors with the curved tip. They are spring-loaded and light weight.


Also, I have a shielded pair. The flat "shield" rests against and protects your fabric as you cut.

These are the Gingher brand.

When I first started doing applique, I was using my regular thread clippers to snip threads. Then I read a resource that warned me that it wasn't a matter of "if" I would cut my fabrics, it was only a matter of "when". Everyone has to decide for themselves, but that warning was enough for me to decide to invest in a pair of applique scissors. I would hate myself if I put a lot of work into a piece only to accidentally cut an unwanted hole in my fabrics. Ugh.
Finally, you're going to need some sort of light source for tracing out your applique templates. I have this Alvin ARTOGRAPH Lightracer II available from Amazon.


This is a relatively expensive way to do it, but again, I do a lot of applique, and so the cost was worth it to me. There are cheaper ways to do it. For example, you can tape your pattern to a window and use natural sunlight to trace your applique templates. Also, you can rig up an empty glass picture frame with some sort of light source below it and use that for your light box. Another easy less expensive and portable way to do it is to use one of these ArtBin Super Satchels.

Dividers inside can be removed. You can then insert a light source--a flashlight works well--close the lid and use that as your light box. You can probably think of other ways to create a light box for yourself. It's possible to trace your templates without using a light box, but your job will be easier and less frustrating if you design some sort of light source for yourself.
So that's about all you'll need other than a pattern or some idea about what you'd like to make. And with that, I say it's time to get to it! Here's how it's done.
The first thing you'll need to determine, whether you've made your own pattern or you're using a preprinted one, is whether the applique templates are reversed or not. Most patterns will say right on them whether you need to reverse your pieces or not.


On this pattern, the pieces have already been reversed. This is important because you will be ironing your fusing medium onto the wrong side of your fabric. That means that the pieces will need to be mirror images of the ones you'll see once you've fused them to your background fabric. If the pieces are NOT reversed, simply flip your pattern to the wrong side and trace the applique pieces that way. The lines will show up easily if you're using a light source of some kind.
Also, you'll notice that some of the pieces on the pattern above have some dotted lines. These dotted lines indicate that portion of the applique piece will be under another piece that will be fused over the top. (This will all make better sense in just a minute.)
I always start by drawing a template of my pattern using wax paper and a Sharpie. This will help you with placement of your applique pieces. The pieces will be applied in numerical order according to the way they are numbered on your pattern. (Don't forget to engage your brain, however. Sometimes the patterns are wrong.)

Simply trace all the lines from the pattern, including all the dotted lines, onto your wax paper template.

When it's complete, you'll have a pattern that looks just like your printed pattern, but it will be possible to see your fabric through the wax paper.

Now you're ready to work with your fusing medium. The "sticky" side (the side that will be ironed onto the fabric) has a waffle texture.

The paper side is smooth and will have the brand name stamped on it.

Place your pattern over your light source and then place the fusing medium paper side up over the top of the pattern. Then trace the pattern pieces in numerical order. Generally, I trace and fuse mine one at a time, but you may prefer to trace them all out at once. It's a good idea to number them as you go. Also, draw in the solid lines and dotted lines just as you see them on the pattern. This will make placement on your background fabric easier.

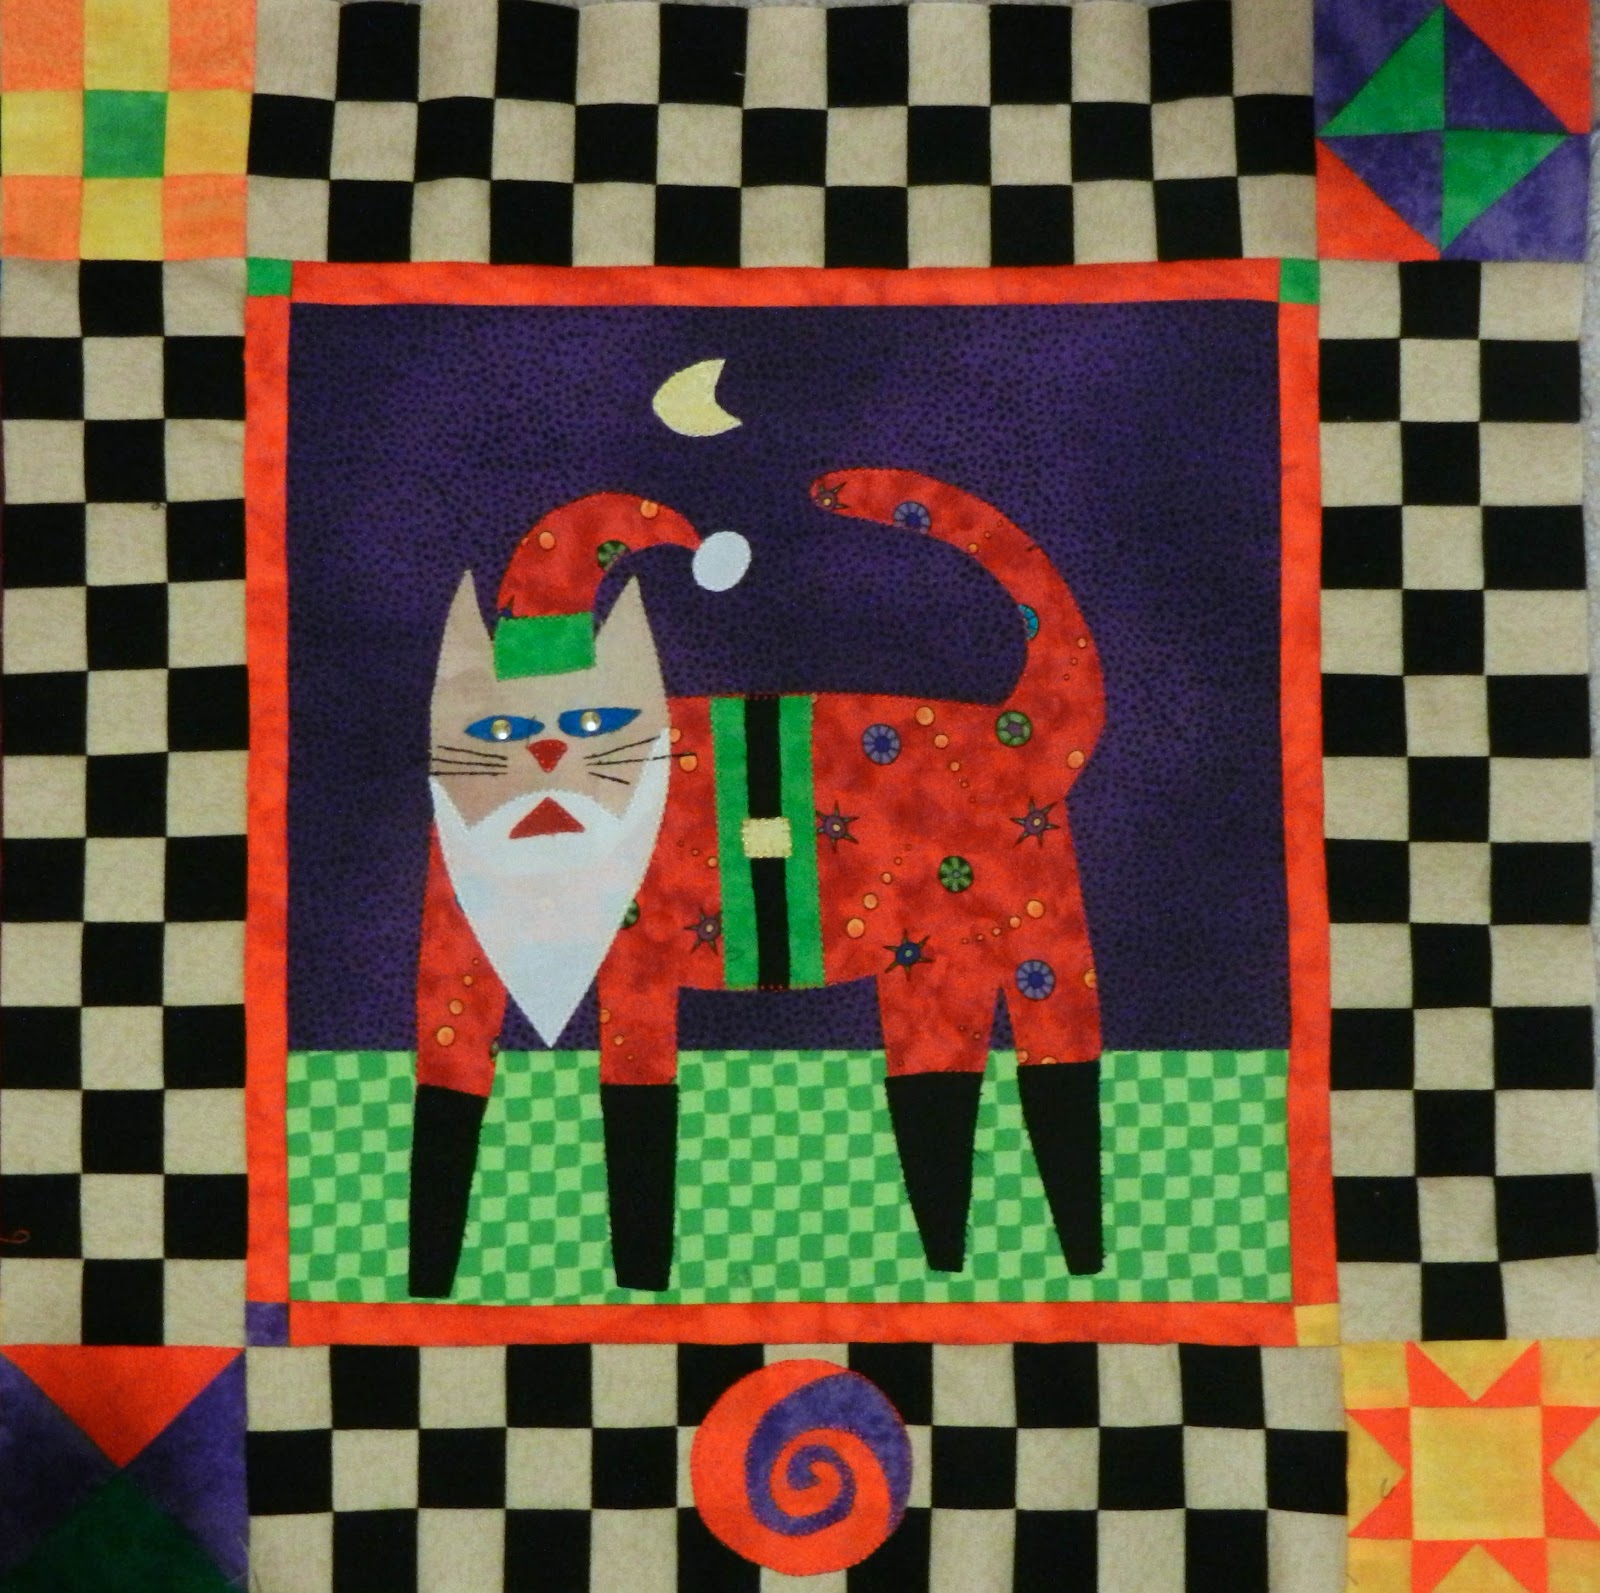
Here is the first piece of my pattern--the cat's body.

Next, you'll want to cut the piece out, but leave some excess around the traced line. You won't want to cut on that line until you've fused it to the fabric. Also, fusible applique will make your pieces stiff. If the piece is particularly large, as this one is, or if there are going to be multiple pieces fused on top of one another, I like to cut out the center of the fusing medium so that I can avoid some of that stiffness in my quilt. This is personal preference, and you can leave it as is if you like. You can retain the center piece and use it to trace other parts of the pattern.

Now you're ready to iron the fusing medium to the wrong side of your fabric. Keep in mind that you will be turning it over and fusing it to your background fabric once you've cut it out. Read the manufacturer's instructions for how long to hold the heat source over your fusing medium. Heat 'n Bond suggests 2-3 seconds for fusing the paper to the fabric.

Once the fusing medium has been ironed onto the fabric, you'll be ready to cut out the piece on the traced line. Give it a chance to cool before cutting.


When that is done, you can peel the paper from the fusing medium.

The glue will be left behind, and it will appear shiny on the surface of your fabric.

Now you can use your wax paper template to find the correct placement on your background fabric. My background for this piece was pieced together. The solid and dotted lines on the pattern indicate where the cat is place in relationship to the seam. Line up the template with the seam line.

Then place your cut applique piece under the wax paper and line up the solid and dotted lines.

When you're satisfied that the placement is correct. Remove the was paper template and set it aside.

Now you're ready to iron the applique piece onto the background fabric. Heat 'n Bond suggests around 8-10 seconds for this. I just count it out: one one thousand, two one thousand, three one thousand, etc.

Once that's done, you're ready to move on to the next pieces. There is no correct up or down to the fusing medium...only the right and wrong side, and so it is perfectly okay to trace your applique pieces upside down and sideways, however they fit on the fusing medium in order to stretch your use of it as much as possible. These next pieces are the Santa cat's boots.

Trace them as before, and cut them out leaving some extra around the edges until you have fused them to your fabric. Then cut around the traced line.

Now your wax paper template will become truly invaluable in getting the placement correct. Note that these pieces overlap the red cat slightly. The dotted lines indicate the bottom of the cat's legs because they are under the boots. The solid lines indicate placement of the boots. Tweezers are very helpful in getting the placement correct.

Continue on until you have fused all of the applique pieces to the background fabric.

Once all of the pieces have been fused down, you'll be ready to top-stitch them into place. This will prevent the edges from peeling up or fraying.
You can use whatever thread you prefer. I like to use rayon machine embroidery thread for my top thread. It has a nice sheen, and it is especially nice if you use a satin stitch for your top-stitching.

Of course, every sewing machine is different, but I prefer to use a cotton thread in the bobbin when I'm using a rayon thread. For a buttonhole stitch, I've found that rayon is too slick to use in both the needle and the bobbin. The two threads slip against one another and my tension isn't good. If I use cotton in the bobbin, the threads cling to one another better. You may have a different experience with your unique sewing machine, and so some experimentation is in order here. Decide which threads you like and use them. If you're using different threads, it's good to come close to a match in the color so that your bobbin thread isn't visible from the top.

Also, I use a top-stitching needle.

You can see in the image below that the top-stitching needle on the right has a larger eye than the universal needle on the left. This means fewer problems with thread breakage, especially if you're using metallic threads or other specialty threads. Again, you will need to experiment a little bit with this if you find yourself having troubles.

The color of thread you use is strictly up to you. I have used black or white exclusively regardless of the color of the fabric I'm using, and I have used threads that match each piece. Whichever you prefer is the correct choice. In this case, I'm matching my threads to the color of the fabric.
If you're using a buttonhole stitch or a satin stitch, here's a tip about how to start and end your line of stitching. You'll be clipping your threads right next to the fabric, and so you want them fastened down somehow. I like to start my line of stitching a few stitches from the edge of the applique piece. I'm doing a buttonhole stitch here, and so I take two straight stitches beginning a little bit from where I want my line of buttonhole stitches to begin. (It helps to hand crank the needle for this.)

In this next image, you can see that I've taken two straight stitches, then turned my fabric to begin my buttonhole stitch.

Next, I turn the fabric just slightly to accommodate the repositioning of the needle as it moves left and right.

You'll want most of the stitch on the applique piece with the straight line of stitching right next to the edge.

When you come to the end of the line, simply reset your machine to a straight stitch, turn your fabric and take two more straight stitches right over the top of your buttonhole stitch to finish it off.


Raise the needle, and clip your thread right next to the fabric.

You can see that those straight stitches you took at the beginning and the end are nearly invisible.


If you're stitching a piece where your line of stitching will completely encircle the piece, you can do the same thing. Begin with a couple of straight stitches.

Then begin your blanket stitch (or satin stitch). I've raised the presser foot here so that you can see where my needle and thread are.

Then continue stitching all the way around your applique piece and stitch right over the top of the straight stitches you started with.

Once your buttonhole stitch meets up with the beginning of the row, you can again switch back to straight stitch and take a couple of more stitches to end it off.

Here you can see that those straight stitches blend right into the buttonhole stitch and become invisible.

If you can't do this or don't like the look of it, you can always dab the ends of your threads with some Fray Check.


You can then decide to add embellishments, as I did for the cat's eyes and whiskers, or you can wait on that until you've quilted your finished quilt.
I hope you've found this tutorial helpful. If you have questions, please feel free to email me. You can find my email address in my right sidebar.
317 comments:
1 – 200 of 317 Newer› Newest»Hi there, I finished up a quilt top for my oldest son for Christmas but I'd like to start right away on one for the 2nd boy! Thanks for the giveaway :)
What a GREAT post!!! Where was this when I was trying to learn fusible applique!!! Thank you so much for taking part and sharing some great secrets!!
Love your instructions! I have done some tshirts for my daughter and have just backstitched my stitching some. The few straight stitches look so much better. Thanks.
I'm a follower...loved the Smitty hanging through the cat door picture awhile back.
I have a Christmas applique wall handing that I wanted to make before Christmas. I'm hoping it's done by next Christmas. Love your tutorial.
rsgrandinetti@yahoo(DOT)com
I follow as Renee G on GFC
rsgrandinetti@yahoo(dot)com
Hi Barb!! What a fabulous tutorial - thank you so much for all the time and effort you put into it for all of us!! I follow you in that your blog is on my sidebar of favorite blogs!! And Aurifil rules!!
That's a lot of great info, thank you :) I have a list a mile long, or so it seems, of projects I'd like to start, and I've added a page on blog with many of them! Happy New Year!
That is a fantastic tuorial Barb-it must have taken ages to do.Loving your cat blocks. I love my Galaxy snippers. About to start on a quilt for my great nephew that has alot of applique on it.
Thanks for the cahnce to enter the giveaway.
Am a follower.
Hi Barbara
I really enjoyed reading your tutorial.
I am a follower.
Great fusible applique tutorial! I am learning so much on this Quilting Secret Blog Hop! When I quilt, I learn as I go...changing things as I think of something else to do.
Thank you for participating in the hop!
Thanks for all your wisdom on fusible web. I always end up making a mess with it so I can use all the help possible!
I am a follower.
Great post Barbara. I love doing appliqué this method. I've yet to make an appliquéd quilt larger than doll size but the Folk art cat quilt pattern is starting to call me ...
I am a follower.
Great post... thanks for the tips! I'm not a big appliqué fan, and haven't done much so this was helpful
I follow your blog in google reader
Thank you for sharing your success! Your hints and photos are very informative.
Thank you for a great tutorial. I haven't done any fusible applique in years, but have learned a couple of new tips from your tute.
Your appliqued quilts are just stunning!
I follow your blog via GFC.
Hi Barb, I haven't been on here in quite a while. I am so glad I read your post today. I have been wanting to try applique and now your tutorial has given me the guide to follow to attempt it. Thank you so much for this.
I have just started doing applique so your post today is really going to help me!
I follow via GFC.
Your applique work is wonderful! Thanks for sharing your technique. I've an appliqued baby quilt that I need to get started on(she's due in Feb.) Seeing how I've waited so long to get started maybe fusible is the way to go!
So glad I joined this site, great information on photography.
Thank you for the tutorials. My next project is going to be a quilt for my first Gt Gt nephew due to be born in April.
I absolutely love applique but am still in the learning process. Love all the ideas. Thanks
I follow by e-mail.
I absolutely love your cat for all seasons quilt. Thank you for such a detailed post on applique. It makes it more appealing to me. I have always tended to avoid it.
I am a follower.
Well done! Just a super post and tutorial.
Thank you for the amazing tutorial! I have got to get some fray check! I tend to avoid applique. I have one piece that needs attention. I have fused it onto my background fabric, but I haven't finished the piece with stitching. You've inspired me to finish it up. Thanks!
I follow by email. Thanks for the giveaway!
Thanks for the beginning and ending guidance. I've always wondered how to secure the threads. I have so many projects swirling in my head at the moment. I owe my little boy a quilt--he gave "his" quilt to his little sister last year because she loved it so much. Thanks so much!
I have done a little fusible applique and this is the best and most comprehensive article I have read - thank you Barbara! I'm going to find some applique scissors now!
I'd like to start a quilt for my three year old nephew.
Deborah
pinkscissorsdesign @gmail .com
I'm a happy follower!
Wow! Just wow! Last month I attempted applique for the 1st time and didn't have much luck. Now with this tutorial I know that I will succeed next time. Thank you so very much. I really needed this info.
I follow via email subscription.
Deborah
pinkscissorsdesign @gmail .com
I follow through Google Reader.
Great question! All day long I've been focused on what projects I want to finish--thanks to Melissa!--but just a few minutes ago I got excited to start a Vintage Ornaments wall-hanging. I think I'll treat myself to a new start once I've completed a lingering project.
I follow you via email.
Excellent tutorial and photos. I liked your hint about the straight stitching when using the buttonhole stitch to appliqué.
Thank you for a super post! Great tutorial and love all the pictures for us visual folks. Loved the tip about using cotton thread in the bobbin when using rayon thread. Agree that the going is better when you have the correct tools. I've just started a two fabric applique wallhanging of two dragonflies and am excited to get it finished.
Thank you and Aurifil for an awesome giveaway and a chance to win.
usairdoll(at)gmail(dot)com
I'm a follower via GFC, email and BlogLovin
Thanks again for a chance to win.
usairdoll(at)gmail(dot)com
Thanks for the wonderful tutorial. Learning to applique is one of my goals for 2013 & all your tips will really help. And thanks for the chance to win.
I'm a follower - receiving posts by email & also through GFC. Thanks.
This has been a wonderful way to start the New Year. I love the tip on how to start and stop using a blanket stitch.
Thank you.
Thank you for the tutorial, I saved it so I can follow later. Don't enter me into the contest though, my older machine only holds regular spools and I can't tell if these are the larger ones or not. The tutorial is prize enough!!!
Thanks for the tutorial. I haven't really done any machine applique. I really should give it a try. I didn't know there are special needles for top stitching. I will have to look out for those.
Wonderful tutorial, very helpful. I am a fan of the blanket stitch as well. This year i hope to finish up some old projects, and try some new BOM . Thanks, going to follow you.
I cannot start any new projects I have to finish the two I have been working on. Thank you for a great tutorial and giveaway. Fan4may at aol dot com
Great tutorial. 2012 was supposed to be my year to learn to applique however "life" got in the way. I've decided 2013 will be the year! Happy quilting.
I follow your blog! Fan4may at aol dot com
Love your post. Your pictures are superb with excellent instructions and detail. Thank you so much for sharing your secrets!
Thanks for such detail on fusing . Great post....but the biggie secret for me was the 2 stitches before and at the end of the buttonhole. Never seen that before and it is a slick trick. Thanks.
I follow through Google reader.
What a good post! I learned a few things that I'll be trying, thanks.
I did a Elf Wall hanging but it was not appliqued.I gained a few really good tips from you today especially about cutting out part of the image.Fantastic work.
I am a new follower by email.
I enjoy appliqué -- fusible and needle turn.
I follow through my blogger account and Google Reader.
You make it look so easy. I am not fond of applique, but the fusible route looks like something even I could do.
What wonderful details in your pictures!!!! I would really to to start on a sampler quilt in the next week or so trying to decide on colors.
sowingstitches[at]gmail[dot]com
Excellent tips! Thanks for the chance to win!
Very nice tutorial Barb. You included great detail for us. I am in the middle of two large quilts right now; and going to start a small piece this afternoon with friends. we try to get together once a week...if nothing else for tea..lol
I am a follower
What a festive Christmas cat! The next project I'd like to start is a Granny Square quilt. I'm still finishing up all the unfinished Christmas sewing though!
I follow through Google!
Wow that was a great tutorial but even more that was a great example of stitching perfection I was in AWE!! WOWZA!!!
I am a follower thru Google
Great tutorial Barb! I have two tumbler quilts that I need to get together.
I'm a happy follower.
That was very helpful Where I have trouble with appliqueing is the heat bond. What my friends use is wonder under but I still have trouble makiing it work. I don't know if I am using the iron right. I will see if I can find the brand you use and try that. Thanks for the great advice. And what a nice give away.
My next project is a guild mystery quilt. My fabrics are selected, washed and pressed so. Now it's time to begin cutting.
Thanks for a great tutorial. Although I've done a lot of appliqué, I've picked up some great hints! On my list for 2013 is an appliquéd Edyta Sitar quilt - I'll definitely try the 2 straight stitches at the beginning and ending of the pieces. Thanks again! ~Jeanne
I'm a follower! I follow through the blogger dashboard. ~Jeanne
I've been using this method of applique for years. I like the idea of the clear plastic bin with a flashlight for a light box. I've been using windows which means I need to plan ahead. Great giveaway. Thanks.
I'm a follower.
That is a lot to take in but you explained it so nicely. I am going to have to give it a try. Thank you for the great tip and the chance to win.
I'm just starting to do fusible appilque & this was a big help to a "newbie"! Thanks!
I follow you on Google. Your quilts are amazing. I love the turquoise cat. Made me smile this morning.
What a thorough and detailed tutorial!!! So helpful! Thanks for sharing and for the chance to win this great prize!!
I am a happy follower through RSS feed (Google Reader).
this is a very detailed and excellent photography of this process that is so fun. Wonderful past quilts, I can see why you were asked to relal this quilting secret.
Virginia in TX
I just did up my Snowmen rows in fusible work - the first time I've cut out the centers of the medium before applying it (don't know why it never occurred to me before), and I was so happy with the immense improvement of drape on the finished blocks. Great tutorial here.
Great tutorial. Thanks for the chance to win!
I have your RSS feed in the Google follower, but I really prefer coming over from my blogroll on my sidebar. :)
I am your follower!
thanks for the tutorial.It looks easy to follow.Thanks so much for sharing your tips.
awesome tute! Thank you so much! I love your blog....
I`m a happy follower by email-
This year I want to do several Dear Jane blocks and quilting some of my tops.Thanks you for the chance to win!!
What a fantastic post, Barbara - really helpful! I haven't tackled any applique to date, but you've enthused me - thank you!
I follow you by email. I LOVE machine applique and I enjoyed your very detailed tutorial. I have a number of UFOs that I really need to complete, so I'm hoping to get a start on these real soon.
I am getting ready to start my largest quilt ever, a double sized for my daughter's bed using the spin cycle pattern
I follow your wonderful blog
What a lot of work you did for this blog - thanks! I really like the tip on straight stitching to hold the stitches of the button-hole stitching. Why didn't I think of that! It's great to learn something new every day.
I follow through GFC and email - I get behind on checking my Reader, but I always read my emails!
I'm an email follower.
Great tips (especially about the scissors; I was clueless about those)! I especially love your "A Cat for All Seasons" applique, too!
I'm a follower via GFC and Google Reader! Happy New Year!
I must quilt my DDIL's Christmas tree skirt and granddaughter's quilt. Next is tote bag for another granddaughter. She wanted appliques on it. I also have to make a small quilt for a contest with 25 somethings on it to represent 25 years of guild.
I'm sure there are many other must do's.
Thanks for your blog and give away.
This was a great tutorial. I do a lot of fusible applique. I have the most problem with my applique lifting after i have ironed it on to the background. I do leave extra paper around my pattern line before i fuse it and cut it out but it is like it doesn't want to adhere to the background. i wondered if i was holding the iron on for too long when adhering the applique to the background. I do 10-12 seconds. Do you ever have trouble with that? I use Heat and bond lite also. I am going to try a little less time on the first step of adhering the heat and bond and see if that helps. I was using 10-12 seconds for that step too. Thanks so much for taking the time to do this tutorial. Applique quilts with embroidery are my favorite. janita
I enjoyed reading your tutorial and I do have the different fusibles. I never thinking about the type of needle I use, so need to go through my packs. I plan on doing more machine applique, so it is nice to see this hop and get ideas to try.
Debbie
I am a follower.
Debbie
I finished a BOM called Growing up on the Ranch last year, it's at the quilter right now. I used the blanket stitch on it. It called for needle turn but that didn't interest me at the time . I'm a fusible girl. Your tutorial was very helpful. I learned new things to try on my next applique quilt.
Me again ! I follow you by email.
Great tutorial! Thank you. This is also how I did applique, have the same light box from Michaels (used one of those 50% off coupons). I did not know about the wax paper and think that's brilliant. I have found that I've tried using the lighter weight fusible bond and find it's a nightmare to peel off the paper without taking the glue along. Maybe it's the product, but any tips? Thank you!
I'm a follower.
For ny next project wanted to do and elongated churn dash!
I follow your blog using feedburner and also by checking it through a bookmark on my toolbar!
Oh Oh -- you have so inspired me with this great tutorial of how to applique... you put so many good ideas and tips that any one should be successful doing it this way..
This is on the top of my list for the new year -- good idea of the two straight stitches at the beginning and end...yes - I also like how on the large pieces you cut out the middle of the fusible so the project is not too stiff..
Thanks for taking the time to make this sound so easy - that anyone would want to do it..
MaryLou
Fun4Me1249@aol.com
That was a good tutorial, very well explained and lots of pictures. Thanks so much..
Yes Yes Yes - I am a huge follower - look forward to your happenings each day...
Thanks for a great blog....
MaryLou
Fun4Me1249@aol.com
Thank you for the tips. My first project for 2013 is finishing my Terrain quilt.
I follow through blogger dashboard.
I am working on some monogram pillows for my neighbour to gift to her great grandchildren - these projects are always fun!! Thanks for your secrets... you have clearly laid it all out for appliques!
Great tips! I am just starting Baltimore autumn so this was a timely lesson. Thanks a lot!
I am a follower - thanks for a second chance!!
Wow!! This is the best post on fusible applique that I have seen. Thank you so much for sharing. I never thought about the wax paper placement template. Good idea. And the rayon/cotton thread-maybe that is why I kept breaking my thread. Or could be the bigger needle size. Lots of new things to try now. Yippee!
I am a follower too.
Yes, I am a follower.
I just love AurIfil thread. Good idea about mixing thread types. It makes sense.
This was a great tutorial with so many hints that I can use. Thanks!
I just started following you and can tell I'm going to love it!
Thank you for the great hints. I have done a little bit of appliqué but would really like to get better at it. This will be a big help.
I have been a follower for a while now, over a year I think. Your projects are always so beautiful a nd fun. I am dreaming of the day I have half of your skills when I do my appliqué projects. Thanks for sharing.
Thanks for the great Tute! I have the Cat for All Seasons quilt in the works--I have had the book and all the fabric set aside for years and am determined to finish it this year--so this was very timely.
I usually do my applique by hand with a blanket stitch but I have learned a couple of things from your post. Thank You
Barbara, this was a great post ... you always do such a terrific job of laying things out in a cohesive, understandable manner. Funny, the first quilt I *finished* (not started) was also an applique piece! I got some great info and tips from your post -- the top-side needle instead of the universal (I had no clue) and the straight stitches before and after your buttonhole stitches (duh -- why hadn't I ever thought of that?!). And a great giveaway, too!! Whoohoo! :)
And I'm a follower! :)
Thanks for the great lesson. I have always heard you can't teach an old dog new tricks but your tutorial sure proved that wrong. Using different thread on the top and in the bobbins sounds like it will solve a lot of my problems. Fusible web has come a long way since I first started quilting in the 80's.
Thanks to M. Pickles for sponsoring these great teachers.
I am a follower.
LOVE your Checkerboard Flowers! Your straight stitch at the beginning and end is a great hint.
I'd be thrilled to win the thread !
Jeanne :)
I have your blog on my Google Reader list, so that's how I "follow" you.
Jeanne
I have found myself picking up and playing with more applique style blocks and quilts...
I love your hint for starting and ending the stitch so that its tied down....
thanks
I found this very interesting and helpful. I just started to teach myself button stitch fusible applique. I made a mini quilt Santa and I really liked it. Thanks.
I follow you my email. Thanks for all you do.
What a fantastic tutorial Barb, this is definitely getting bookmarked :D
Thank you for a outstanding giveaway as well.
I've been following you now for quite sometime on GFC :)
I love machine applique, and almost always use the satin stitch, and pull my threads to the back when done. Also use Misty Fuse almost exclusively. Really like the idea of taking a couple of straight stitches to begin a line of sewing, whether satin stitch or buttonhole. Thanks for a great tutorial!
That was a fantastic tutorial Barbara! I only wish my machine had blanket stitch... top of my requirements for my next machine lol
I follow in a friendly but not over-powering way while walking on my hands!
What a beautiful tutorial! Your details and the photos taken were top notch! Thanks, it's appreciated. Jane
Barb, I'm a happy follower of your blog and am amazed by this post that you've only been quilting since 2008?!%$#!@!! Yikes!
You have many beautifully done quilts and projects. Nice going. Jane
What wonderful information and your photos really show everything! Great giveaway too!
Great tutorial - especially that little tip on starting/ending with the straight stitch. I'm about to start on my first machine applique project, so this came at just the right time. Happy New Year!
I am a follower, thanks Barbara!
Of course I'm a follower :-)
What a great tutorial. I love the detail and the tip about starting and stopping with a couple of straight stitches is great. That had never occurred to me.
I have one quilt to finish and then my next project will most likely be an applique so your tips will come in handy.
kj_hahn(at)telus(dot)net
Ok - you get the gold medal for the BEST, EVER informative tutorial writer...EVER! I devoured your photography one and now I am printing this one out too. I have a ton of applique quilts I want to do and I have no idea what I am doing. I have only done one and I need help so thank you, thank you, thank you!
I love machine applique! Thank you for the great tutorial. I am doing table top BOM's this year'
jbechosend at sbcglobal dot net
I am a follower via e-mail.
jbechosend at sbcglobal dot net
I actually laid out flannel squares in the plus pattern this morning, plan on sewing it together tonight. Birthday gift for my dad...
lisamcgriff (at) hotmail(dot) com
I am a follower!
lisamcgriff (at) hotmail (dot) com
Great tutorial! Thank you so much! Especially liked the beginning and ending stitches info!
I'm a follower.
This was a wonderful post about applique - thanks! Also, thanks for the chance to win. Happy New Year!
I follow through google.
I wish that I had this tutorial BEFORE I made my Christmas tree quilt. This was so informative and I thank you so much.
What a wonderful tutorial!
Wow! What an awesome tutorial. Thank you so much for sharing your talents with us. Beautiful work!
blessings, denise :D
My next quilt project is going to be a churn dash quilt. Thanks for the giveaway!
I did not know the difference between universal and top stitch needles. I think switching types might help reduce the number of thread breaks when quilting. Thanks!!
Wow....I'm down for the count. First you show us awesome drool-worthy quilts, then you have a super tutorial that showed me some things that I've never tried, and will help my applique. I'm going to try to find those needles, for sure, and as soon as I can, get some scissors!
Thank you so much, Barbara, for investing the time to do this right, and share it with us! Hugs!
I'm a follower!
I really like the way you start and end with a couple od straight stitches! Such a great tip! Thanks for this info on using the fusiable.
hulseybg at gmail dot com
I'm a new follower by e-mail.
hulseybg at gmail dot com
I love to applique with fusible web, it's fun and quick! I really enjoyed your tutorial and will put your advice to use!
I am a new follower.
Great tutorial! You've covered every detail in fusible appliqueing.
I've been following your blog for several months and it just gets better and better! PS, I love cats too.
Wow, what a wonderful and detailed post, love it, I am working on several projects one being my own QAL and also joining Pile O'Fabric BOM.
I am a follower.
Thank you for the post. Its nice to have it explained with pictures since I need to see it done. I follow you by e-mail.
I found this tutorial very helpful, but I do have a question. When white fabric is appliqued over a bright/dark color doesn't the color show through the white? I've had this problem with regular hand applique.
Thanks so much for this Tutorial!! Saved info, for later project! :) Workin' on a 1/2 Square Triangles quilt now. Next on list is a Disappearing 9-Patch...
Thanks for chance to win! :)
Already a super loyal follower! :)
Following via blog lovin'!
msstitcher1948@yahoo.com
Great tutorial and I learned a lot, thanks.
I'm a follower.
HI! HAVE NEW CHRISTMAS GIFT FABRICS AND I'M EAGER TO START A NEW QUILT, MAYBE A BABY QUILT FOR CHARITY!
THANKS FOR A SWELL GIVEAWAY!
msstitcher1948@yahoo.com
Thanks for the great, detailed tut! And thanks for the giveaway!
And I'm a new follower!
Thanks for all the tips, Barbara! I have done a lot of applique but I've never made the outline on freezer paper. I will definitely do this from now on!
Wonderful tutorial. Lots of good tips.
I hope to start quilting a top that I have ready. Thanks for the appliqué tips.
such great tips...thank you....thank you and new follower too
Hi Barbara,
Thanks for sharing the great tips. I've never heard of a wax paper before. I should check it out at my local store.
I'm a follower
Wonderful tutorial Barbara! Love the kitty U
I'm a new follower!
Thank you so much for all of the great applique information. I will certainly use it at some point.
Also enjoy your blog and hearing about your cats from a fellow cat lover.
Meg
You sure do not disappoint! I loved your tutorial - very complete, and the photos were spot on! I have used satin stitch and blanket stitch, but I really, really enjoyed reading about your other methods! Thank you for taking the time to write and illustrate fusible applique!
Thanks for the chance to win. I'll be finishing the pillow I started for my Nana & Pop for Christmas.
I follow via GFC. Thanks!
I am a happy regular follower of your blog! Happy New Year!
Post a Comment