
When I solicited questions for a Fun Fact Friday Freebie recently, I was asked for some photography tips. It was too large a topic to try to cover in Fun Fact Friday Freebie, and so I decided to cover it in a separate post. I've been giving it some thought and this post will summarize my thoughts about photography. It seems presumptuous to call these "tips" since I don't consider myself a photography expert by any stretch of the imagination. Over several years of taking pictures, however, I've learned a few things, and so I'll share that with you. Here's what I've learned:
1. Take Time to Learn. Photography is a lot like bowling...or swinging a golf club. It's hard to think about everything at once. If you're trying to take your photography to a level beyond shapshots, there is a lot to think about: composition, shutter speed, aperture, exposure, etc. Heck, just remembering to hold the camera straight is a challenge for me.
You don't need an expensive camera to take good pictures. When I got interested in photography in 2005, my first camera was a little Canon point and shoot camera. I think it was 7 megapixels. It took really good pictures and some of my best shots came from that camera.


While I was having fun taking pictures, I found myself wanting to understand more about the art of photography, and how to take really good pictures. You can learn a lot just by reading one good beginner book. Here is a link to an article listing several good books.
1. Take Time to Learn. Photography is a lot like bowling...or swinging a golf club. It's hard to think about everything at once. If you're trying to take your photography to a level beyond shapshots, there is a lot to think about: composition, shutter speed, aperture, exposure, etc. Heck, just remembering to hold the camera straight is a challenge for me.
You don't need an expensive camera to take good pictures. When I got interested in photography in 2005, my first camera was a little Canon point and shoot camera. I think it was 7 megapixels. It took really good pictures and some of my best shots came from that camera.

Waldport, Oregon

Lighthouse at Cape Disappointment
While I was having fun taking pictures, I found myself wanting to understand more about the art of photography, and how to take really good pictures. You can learn a lot just by reading one good beginner book. Here is a link to an article listing several good books.
There are also some excellent online courses. Your local community college may participate in a program called Ed2Go where you can sign up for online courses relatively inexpensively. I've taken their Discover Digital Photography course and their Secrets of Better Photography course. Both were very helpful. If you're interested in something a little more comprehensive, I've taken the Fundamentals of Digital Photography course offered by the New York Institute of Photography. These are all courses you can take in the comfort of your own home; i.e., in your pajamas. My kind of school.
While I'm terrible about doing this, it's essential that you sit down with your camera and the instruction book and read through it. Familiarize yourself with your camera's capabilities, even if you don't plan to use all of them. Just knowing what your camera can do will inspire you to learn what is possible.
Finally, there are some great online resources and magazines that will help you to continue the learning process in little bits and pieces. I subscribe to Outdoor Photography, and Digital Photo, both of which offer lots of ideas for ways to experiment with photography. It also pays just to look at some really good photography. My favorite resource is Nature's Best Photography, and then there's always good old National Geographic. And, of course, there are some excellent blogs. I especially like Digital Photography School and Light Stalking. You can sign up to receive regular emails from these resources that will give you tips and ideas to try on a regular basis.
Before I move on to the next section, I want to leave you with this one last article I found online that I thought was particularly helpful: Top Ten Ways to Become a Better Photographer.
2. Take Lots of Pictures. This can't be over-emphasized. The digital revolution in photography has meant that it has become a relatively inexpensive pastime for the hobbiest photographer. Gone are the days when one had to spend money for film or flashbulbs, and when a ruined shot was money down the drain. You can snap away to your heart's content. You can experiment without remorse. In fact, you can take so many pictures that you'll find yourself overwhelmed with images. You can even overwhelm your ability to store all your images.
So, I recommend taking lots and lots and lots of pictures. I also recommend being brutal in deleting them as you go. If you've taken more than one shot of the same subject, choose the one you like best, and discard the rest. (Don't forget to empty your recycle bin too!) Discard any over-exposed images or out-of-focus images. If, however, you find yourself torn about whether to keep or discard an image, keep it. It pays to go through your old images once in a while. With the passage of time and fresh eyes, you may decide that some of those old images are quite good...or that they aren't worth hanging onto. If it's the latter, delete them.
The take away message is that it's good to experiment by taking lots of pictures. In the end, practice will make you a better photographer, even if you do nothing else.
3. Identify problem areas. So if you're taking lots of pictures, try to identify the reason an image fails. There can be lots of reasons, and each photographer will find themselves making the same mistakes over and over again. It will be different for every person. Here are a few of my problem areas and how I have learned to compensate for my own weaknesses. And I still have a lot to learn.
Overblown highlights. See how the details are lost in the brightest parts of this image?

It is far better to err on the side of an image being too dark. Photo editing software is much more forgiving when it comes to brightening a too-dark image. If you've blown out the highlights, there isn't much you can do about it. This has resulted in many a disappointing shot. The best way I've learned to compensate for this is to use two settings on my camera. First, the histogram. Here's a link to an excellent article that explains your camera's histogram. Essentially, it's a bell curve that shows you how bright or dark your image is. Too bright, and the bars will fall of the screen on the right. Too dark, and the bars will fall off the screen on the left. What you want is to see that bell curve right in the middle...or at least close to the middle.
If you're using your histogram and you find that your image is too dark or too light, you can use the exposure compensation button on your camera to let in more light or less. On most cameras it looks like this. Find yours, read your instruction book, and figure out how to use it. Experiment. I can promise you that if you do nothing else, using these two tools will go a long way to improve your success rate.
Out-of-focus images are probably the most common bug-a-boo. In this image, you can see that the auto-focus on the camera did a great job of focusing in on the bubbles, but the child--the subject of the image--is out of focus. This is one of those heart-breaking spontaneous shots that you'll hate missing.
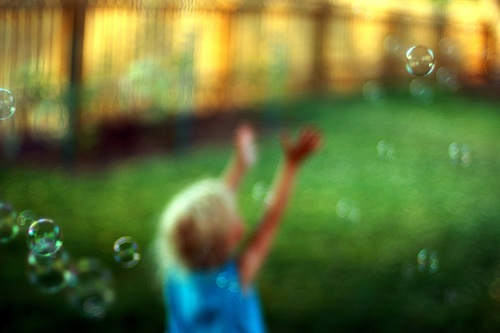
There are other reasons that a shot may be out of focus however. Perhaps you are in a low-light situation, and your shutter speed is too slow. Or your subject is moving--especially common when photographing children or pets. Another reason is that you may be too close to your subject. Your camera's lens has a limit to how close it can be to an object and still focus on it. Think of your camera as an eye. If you hold your reading material too close to your eyes, you can't focus on it, and neither can your camera.
Some photographers will tell you that a tripod is essential for getting images in focus, and that may be. On the other hand, I hate, hate, hate using a tripod, and it's a trade off I've made in my photography. Sometimes messing with a tripod is just inconvenient and burdensome. In other cases you will simply miss the shot of you start trying to set up your tripod. Here are a couple of shots that I would have missed completely had I taken the time to set up a tripod.


Neither image is going to win a photography contest. But then, that's not my goal. My goal is to take pictures and have fun, and these are good enough for me. You will have to make your own decision about how important it is to get the shot vs. how important it is to get the perfect shot. The answer to that will be different for every photographer and every situation.
And here's the last problem area in this discussion: distractions. When you look at the image below, the compost pile on the left, the burn pile in the background (along with the lovely discarded garden pot), and the trailer on the right are all "distractions".

Distractions are often easy to deal with simply by cropping them out in the editing process. It isn't always possible, however. Here's the cropped image, but I still don't care much for the birdfeeder growing out of the deer's head or the little lighting fixture beside him. It's an okay shot, but not a great shot.

She was looking hungrily at the tulips growing in my whiskey barrels, and that's what I was trying to document. Again, this isn't a shot that's going to win any photography contests, but it's okay for my purposes. Nevertheless, I've learned that if I have time, I can delete a lot of distractions from the get-go by scanning my eyes around the viewfinder just before taking the shot. Sometimes I can simply step to the right or left and improve the shot tremendously. It's a good habit to develop, but again, it takes practice to remember.
As you experiment with your photography, you will find that you have your own set of problem areas. They may be the same ones I struggle with, or you may have some different ones. This list is not intended to be exhaustive. It's just an example of how you can work within your own limitations to improve your photography.


You might like to work on using the settings on your camera, rather than leaving it on "auto" all the time. You can tap into your creative potential by experimenting some with those settings. For example, your speed setting can give you crystal clear images or it can allow you to create artistic blur, depending on what you're trying to achieve. Using blur can convey speed in an image, like these dolphins swimming by in an aquarium.

It can also give water a dreamy bridal veil appearance.

Work on proper exposure by learning more about your camera's histogram and exposure compensation adjustment. Exposure also relates to the size of your aperture (something I'm still working on). As I said earlier, there is a lot to think about, and it takes practice. If you pare your goals down to one skill at a time, it will help you to avoid becoming overwhelmed with information overload. It will also allow you to measure your progress more easily.
Finally, recognize that not every subject can be captured with photography. An expansive landscape is difficult to capture in a small image, for example. Also, some subjects just aren't as impressive when all movement, sound, and smell is lost. When you put your camera to your eye, ask yourself, "Is this a picture?" Sometimes, the answer is no. You can challenge yourself by using other elements to create the image you want, but sometimes it makes sense to just give the camera a rest.
5. Know your Purpose. You may decide at some point that you'd like to invest in some equipment to improve your images. There is an advantage to investing in filters, a DSLR camera, lenses and tripods. Before you do, however, know your purpose in photography. If you like shooting nature shots, you might like having a wide angle lens to capture expansive landscape shots. Or if you like shooting close up and seeing lots of details, a macro lens is a good investment. If you like taking pictures of wildlife, a telephoto lens can be a good investment. Realize, however, that you'll also probably need a tripod. A telephoto lens, by its very nature, almost requires the use of a tripod. You can improve your shots of people's faces by investing in a short telephoto lens or a teleconverter, which allows you to get close-ups without standing inside the comfort zone of another. (There is also value to taking candid shots, which is easier when you don't stand too close.)
Photography equipment is expensive, and it's a shame to invest in an expensive piece of equipment only to realize that it will not help you achieve your purpose. Further, you may not be interested in achieving artistic shots. Your purpose may be to document your children's growth and development, and there is nothing wrong with that. If that's the case, however, you won't need expensive equipment. You can achieve your purpose with a good point and shoot camera. Quite possibly, an easy-to-carry point and shoot may be the best investment you can make.
6. Your Camera is No Substitute for Life. Now what the heck does that mean? What I mean is that in your quest to become a better photographer, don't forget to put the camera aside sometimes and just soak up a scene with your human senses. There have been times when I've driven away from a place and realized that my memories all consisted of what I saw through my viewfinder. And that's a shame. Take the pictures you want to take, but take time also to see with your eyes, smell with your nose, listen with your ears, and touch with your hands.

(Image source: Wikimedia Commons)
There is value to being completely present in your life, enjoying an activity for its own sake, laughing, playing, and talking. These are things that require human interaction, and they cannot be achieved while looking through the viewfinder. If you are in a group and you want to take pictures, take them, by all means. But set a limit for yourself...five minutes perhaps. Then put the camera down and engage with your friends and family. You can always pick it up again later.
When traveling, take the pictures you want to take, of course. Occasionally, however, put the camera aside and just drink in the sights around you. Your camera will document some memories, but it is no substitute for your brain. Further, really seeing a place will help you to edit any photos you do take because you will better remember how it looked in reality.
So, this is a long post. I both thank you and congratulate you if you read this far. My "tips" are not intended to convey any sort of expertise. They are, as my title suggests, simply things I have learned over a period of years and tens of thousands of pictures. And I am still learning and experimenting.
I hope I've conveyed to you that the way to take better pictures is to take lots of pictures and learn from your mistakes. If you do that, your photography can't help but improve. And remember that your pictures need only be pleasing to your eye. When you engage in photography, you engage in an art form, and you can take artistic license with it. Being intensely self-critical of your photography will surely discourage your artistic process, and harsh criticism from others will do the same. It is your camera, your photography, your art, and therefore, your rules. Have fun with it, and your pictures will convey passion and joy.
Now I'd like to know what you've learned about photography. Please share your tips and ideas.
12 comments:
Barbara, that was a fabulous post -- some very great tips and smart ideas. I really struggling with lighting in my outdoor shots. And I struggle with not getting my camera out and on and pointed at my subject, when it comes to my grands doing something cute that I want to capture. I don't think there's too much hope for that one, though!! I really liked what you said about a picture being 'good enough' for you ... sometimes you just have to decide that the memory you've captured is better than missing the shot because you waited for the *perfect* shot. Again, *great* job on this!! :)
I tend to learn by mistakes, lol. I am so lazy, I really need to play with my camera and try different settings.
Love your bird entry, beautiful shot.
Debbie
Super post Barbara! Thank you for taking the time to write all of this out and share it! I'm a big photography buff and it's time to take it to the next level. You've provided lots of wonderful information and links. I'm researching cameras right now. I have an Olympus DSL, but my Panasonic pocket camera just died on me and I'm looking for another one. It took good photos.
Great post. I was in a photog club through my work back in pre-digital days, always thought I was 'pretty good' until then - we had judges at each meeting! Many times the results were purely judges personal preference, but even so, I learned a lot. But what I really learned: I wasn't THAT good and my husband was a lot better, so I leave the 'real' photography to him and just use my own little Canon Elph and don't mess with the bigger ones. I always enjoy your photos :)
Oh, and one thing I did seriously learn, watch for those background things behind a person's head when taking people shots - you know, like the pine tree or antenna growing right out of the top of their head ;p
Thanks for all the info here. I need to try the other settings on my digital camera. I'm an auto focus user.
My quilt photos have improved a lot lately because I have moved outdoors for most of them. What a difference natural light and different angles make. At least I am happier with them because they have more interest. Thanks again.
Wow, that's a lot of good info, I had to go online just yesterday to look up something about my camera. It seems like there are so many things you need to know now, so many buttons and what they stand for. My quilt pictures always look so dark, I'm going to look into those two things you talked about, thanks.
Fantastic post....I love these tips and bookmarked it so I can come back. Thanks, Barbara!
Great info Barbara. I need to learn more about my DSLR - I am happy to tell you that you just taught me what that little +/- button is for! lol
A pro-photog told me once not to be afraid to get in close when taking pictures of people. You don't have to show their whole body. I even got that same advice from my water color instructor - I think they know something!!
Great post. I will be looking into some of your tips! The last one is probably the best one. I have caught myself almost missing out on something because I wanted a picture of it. :)
Thanks for all those tips!
number 6 is one that I've forgotten many times!
Barbara,
What does the FO in New FO stand for? I probably should know but can't come up with anything quilt related.
Post a Comment